

 |
| JAC |
Before moving on, if you'd like to catch up on previous posts before continuing, here are the links for Part 1, Part 2, Part 3 and Part 4.
Last update I had imported my DrawPlus Character template into CTA2 and discovered a number of issues.
 |
| 'Inverted' colors of the ear. |
Some body parts had, what appeared to be inverted colors but is actually an issue with how CTA 2 is interpreting the vector art. It apparently gets confused occasionally and will either read a closed shape as open, or think the join is in a different place, messing up the fill pattern.
This problem can mostly be fixed by going back into the DrawPlus file and reducing the number of points in the offending shape (using the 'Clean Curves' function). If the problem persists study where the fills appear to be going wrong in CTA2 and then edit in or remove a few points around those areas in the original DrawPlus file, then re-import.
 |
| Missing ears and inverted color on the right shoulder. |
The next issue was missing body parts. The first thing to do is to make sure the part that is missing has the correct name in the DrawPlus template. With all the renaming you have to do it's easy to miss something. I found I had at least one part left without the correct name.
If all your body parts appear to be correctly named then the next thing to do is to export the missing part as an individual sprite (.swf file) and import it into your character using the sprite editor in CTA2's character composer. This is what I did for a couple of ears in one view that just would not import in with the rest of my template.
 |
| Back to front feet. |
Parts that were positioned incorrectly I simply adjusted them in the DrawPlus template, although for the life of me I don't know why the nose was positioned in the middle of the head in the top down view. I had to manually reposition this in the character composer.
 |
| Nose in the middle of the head. |
How to give your character a tail.
Once all of these issues were corrected I needed to find out how to give my cat his tail?
As mentioned last post, CTA2, G2 characters do have sprite positions for a tail, even though they're not shown or named in the DrawPlus template.
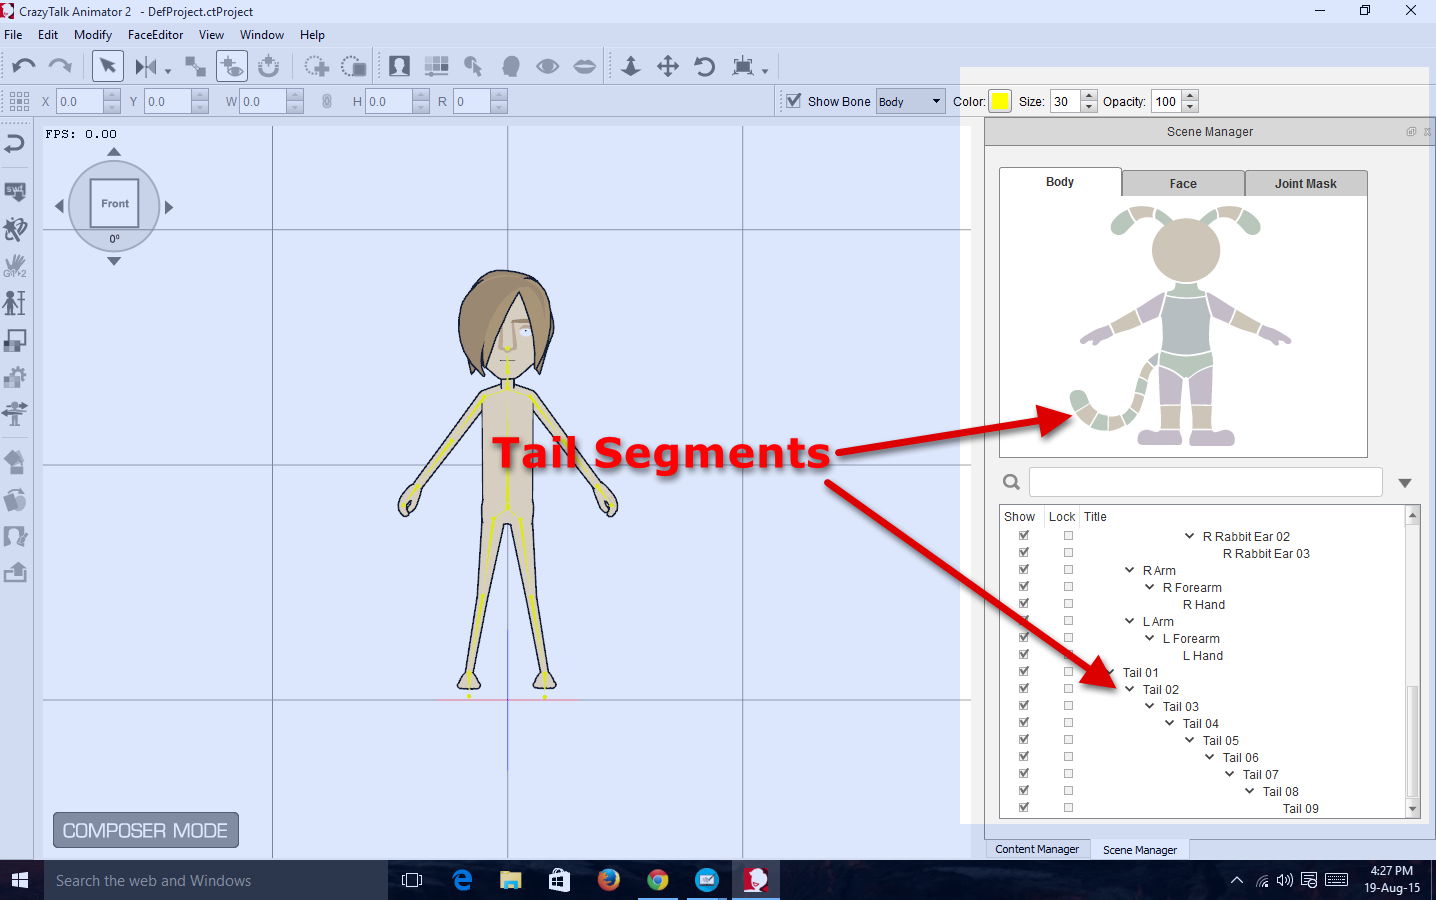 |
| G2 Character Tail Components. |
I was unable to work out what the tail sections needed to be called in the template (using the established naming convention of the other body parts) to get them to import so the next thing to try was to add them in manually, through the Sprite Editor, inside CTA2's Character Composer.
This presented a problem because the actual pivot points of the tail don't show up in the character composer, making it next to impossible to position them correctly.
For JAC I'm using the same tail segments for all views. To manually import them I just select the tail segment I'm importing in the scene manager and then switch to the sprite editor. There you'll see an empty sprite position. From the add sprite menu select 'Add Full Angle' (if you're using the same image for all angles, otherwise select 'Add Current Angle'). You'll see your tail sprite appear in the Sprite editor and the character composer window. Close the sprite editor.
The first tail segment will appear to rotate around the character connector point. However if you move the connector point over the tail to where you want the tail to pivot from, it won't actually move the pivot point of that tail segment.
Since you can't actually see the exact location of the pivot point to move it, here's what you need to do to adjust it.
The pivot point of each tail segment is located at the X and Y co-ordinate of each tail segment so first, set these both to zero (0). That'll locate the pivot point right on the red/blue cross grid line of the character composer.
Now switch back to the sprite editor and move the tail segment over point 0/0 so that point 0/0 is located over the spot you want that section of tail to pivot.
Now switch back to the scene editor and locate the tail where you want it to be on the character's body simply by clicking and dragging the tail segment into position.
Repeat the same process for each subsequent tail segment (you can have up to nine segments).
Once you have all your tail segments in place you can change to a different angle and, just by moving the top tail segment, position the tail in the correct location for that view.
Note that you will not be able to animate the tail of your G2 character using the 3D Motion Key editor as there is no provision for it within the 3D bone structure. Instead you'll need to animate the tail using the 2D Motion Key editor once you've finished all your 3D keying.
So the whole point of this character creation odyssey was to make a four legged, animal character with CrazyTalk Animator 2 by designing the character as an upright, bi-pedal character. If you're trying this approach you're going to run into an immediate problem with CTA2's bone structure.
Animal leg bones tend to be the opposite of humans in how they articulate. The rear legs bend more like human arms, whilst the fore legs bend more like human legs. In order to get this configuration in CTA2's bone structure you need to spin the thigh bone 180 degrees at the hip to allow the lower shin bone to bend forward. Unfortunately this means the sprite for the thigh will be facing the wrong way - as you can see in the side views in the image below.
Fortunately this can be fixed by swapping the sprite out with the correct view from one of the other angles. You'll also notice in the above image that the various three quarter views don't look particularly great. I'm sure with a bit more work I could improve those views. What you see here is just the side view (which I used to establish the pose) rotated through 360 degree angles.
To create a four legged animal correctly you should also rotate the shoulder bone 180 too. It's not as critical as you can kind of fudge it with the bones as they are - as I've done with the running looped animation below. It also makes it easier if you want to have your character being capable of walking as a humanoid character too, as the fore legs are already correct for operating like human arms.
The above animation (an exported GIF from CTA2) does reveal a few issues with my character design. Mainly it's not a good idea to use gradient coloring near joints. I also could do with front paws that are more in the style of the back paws rather than looking closer to stylized human hands. I'm also regretting not giving my character a separate, articulated neck sprite.
However, I do think I've shown that four legged animals are definitely possible in CTA2. You'll need to create your own customized motions. I recommend getting hold a comprehensive book on animating animals. Be sure to save your motion files out for use with other four legged characters.
When creating your animal motions block in all the key frames in the 3D motion editor first. Then move on to the 2D motion editor. You can also swap any sprites and use the layer editor in conjunction with the 2D motion editor.
Although there's plenty of work left to do on this character including all the additional sprites for facial expressions and hands, this is where I'm going to leave this series. I believe I've done enough to show that this approach to animals in CTA2 is viable and could make them more useful as it gives you the option to treat them as two legged characters as well.
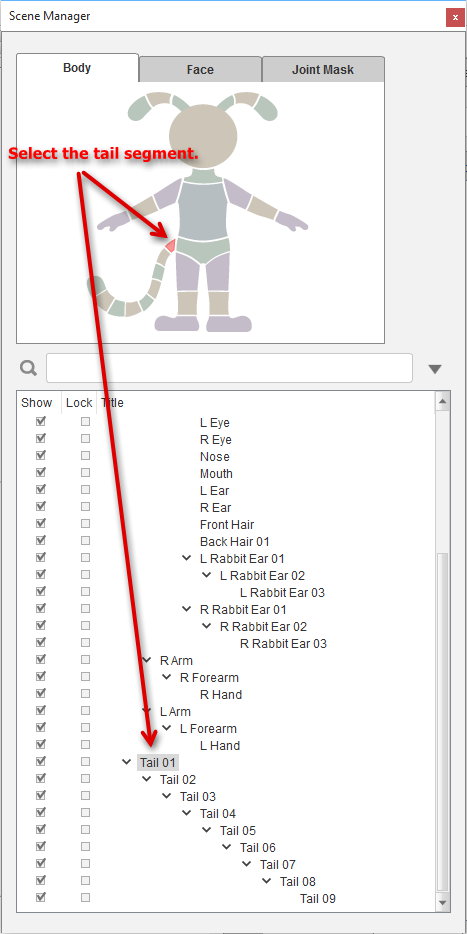 |
| Selecting tail segments. |
For JAC I'm using the same tail segments for all views. To manually import them I just select the tail segment I'm importing in the scene manager and then switch to the sprite editor. There you'll see an empty sprite position. From the add sprite menu select 'Add Full Angle' (if you're using the same image for all angles, otherwise select 'Add Current Angle'). You'll see your tail sprite appear in the Sprite editor and the character composer window. Close the sprite editor.
The first tail segment will appear to rotate around the character connector point. However if you move the connector point over the tail to where you want the tail to pivot from, it won't actually move the pivot point of that tail segment.
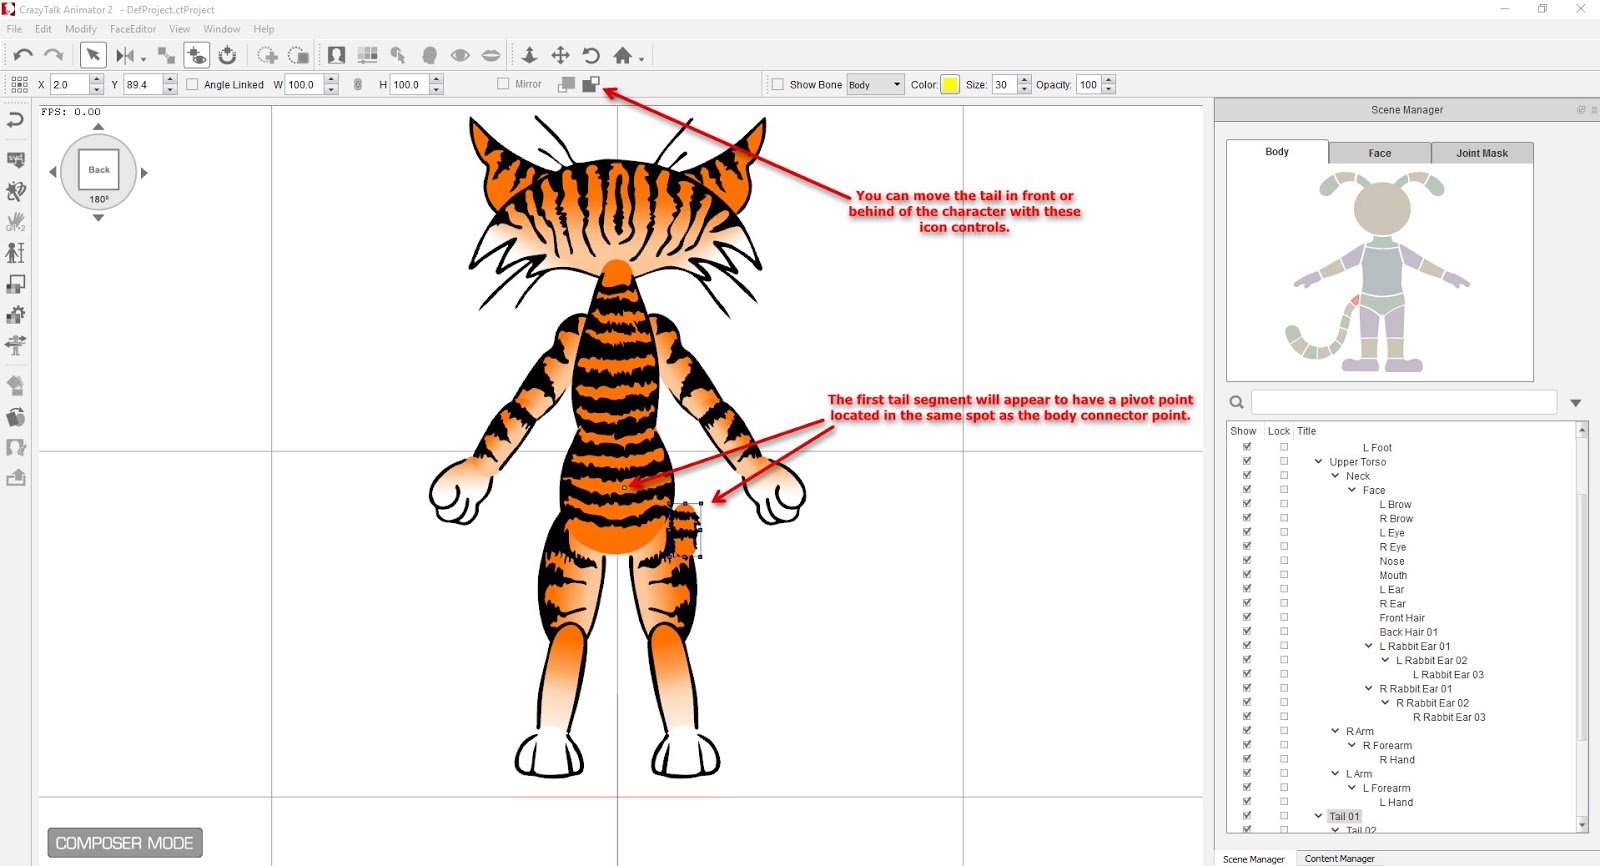 |
| The first tail segment has a pivot point matched to the character's connector point. |
Since you can't actually see the exact location of the pivot point to move it, here's what you need to do to adjust it.
The pivot point of each tail segment is located at the X and Y co-ordinate of each tail segment so first, set these both to zero (0). That'll locate the pivot point right on the red/blue cross grid line of the character composer.
 |
| Locate the tail segment pivot point at 0/0. |
Now switch back to the sprite editor and move the tail segment over point 0/0 so that point 0/0 is located over the spot you want that section of tail to pivot.
 |
| Positioning the tail pivot on the first segment. |
Now switch back to the scene editor and locate the tail where you want it to be on the character's body simply by clicking and dragging the tail segment into position.
 |
| Tail segment one in position. |
Repeat the same process for each subsequent tail segment (you can have up to nine segments).
Once you have all your tail segments in place you can change to a different angle and, just by moving the top tail segment, position the tail in the correct location for that view.
 |
| Positioning the tail on different angles. |
Note that you will not be able to animate the tail of your G2 character using the 3D Motion Key editor as there is no provision for it within the 3D bone structure. Instead you'll need to animate the tail using the 2D Motion Key editor once you've finished all your 3D keying.
Getting on All Fours...
So the whole point of this character creation odyssey was to make a four legged, animal character with CrazyTalk Animator 2 by designing the character as an upright, bi-pedal character. If you're trying this approach you're going to run into an immediate problem with CTA2's bone structure.
Animal leg bones tend to be the opposite of humans in how they articulate. The rear legs bend more like human arms, whilst the fore legs bend more like human legs. In order to get this configuration in CTA2's bone structure you need to spin the thigh bone 180 degrees at the hip to allow the lower shin bone to bend forward. Unfortunately this means the sprite for the thigh will be facing the wrong way - as you can see in the side views in the image below.
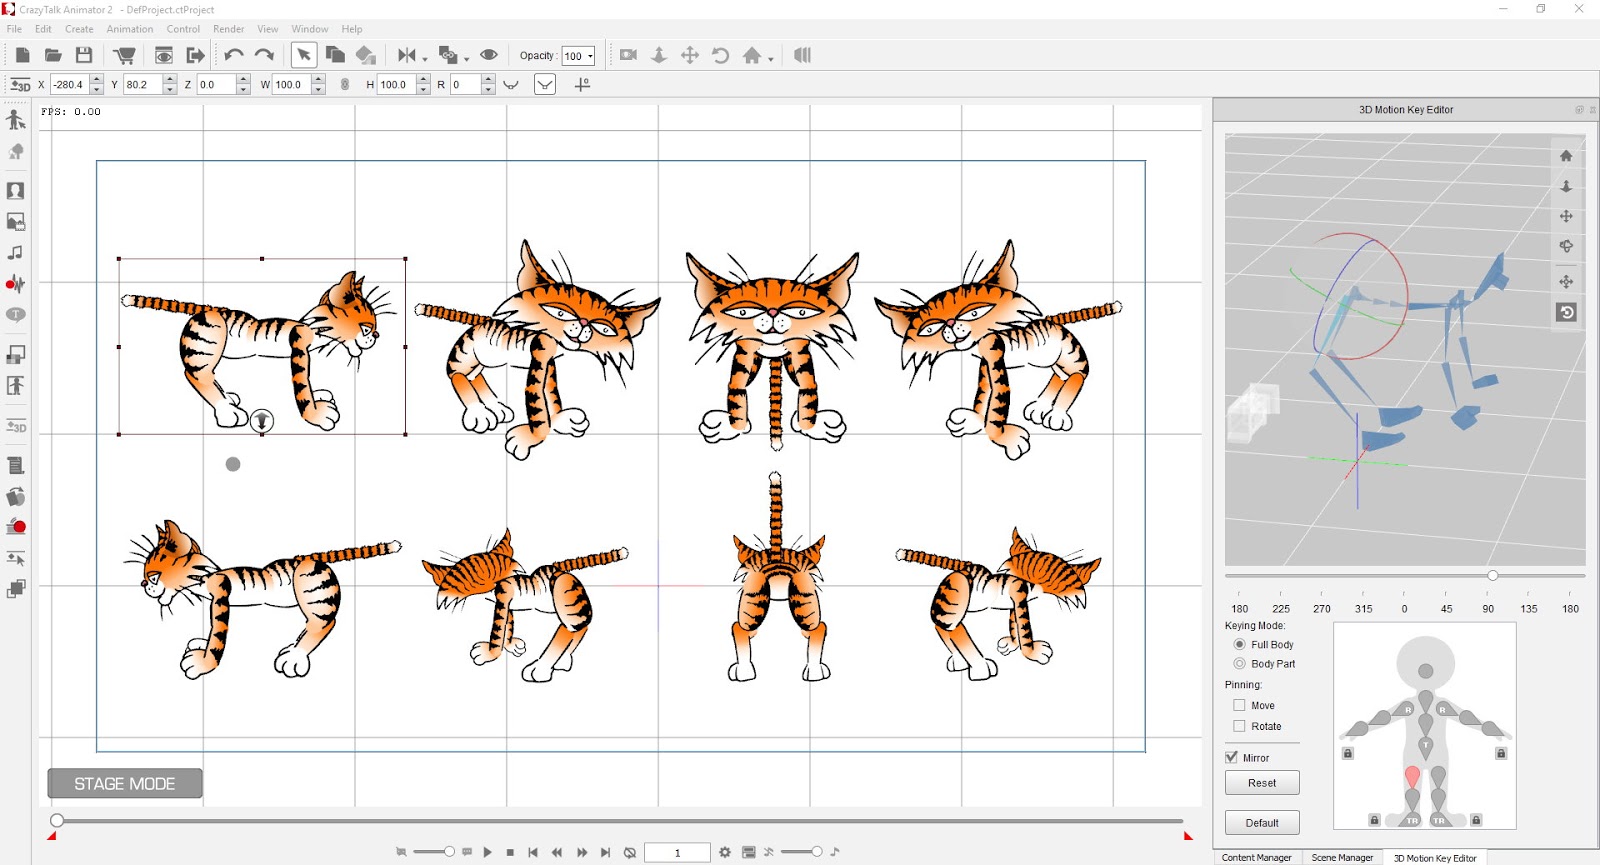 |
| JAC positioned on 4 legs and rotated 360 degrees. |
To create a four legged animal correctly you should also rotate the shoulder bone 180 too. It's not as critical as you can kind of fudge it with the bones as they are - as I've done with the running looped animation below. It also makes it easier if you want to have your character being capable of walking as a humanoid character too, as the fore legs are already correct for operating like human arms.
 |
| JAC Running Loop |
The above animation (an exported GIF from CTA2) does reveal a few issues with my character design. Mainly it's not a good idea to use gradient coloring near joints. I also could do with front paws that are more in the style of the back paws rather than looking closer to stylized human hands. I'm also regretting not giving my character a separate, articulated neck sprite.
However, I do think I've shown that four legged animals are definitely possible in CTA2. You'll need to create your own customized motions. I recommend getting hold a comprehensive book on animating animals. Be sure to save your motion files out for use with other four legged characters.
When creating your animal motions block in all the key frames in the 3D motion editor first. Then move on to the 2D motion editor. You can also swap any sprites and use the layer editor in conjunction with the 2D motion editor.
Although there's plenty of work left to do on this character including all the additional sprites for facial expressions and hands, this is where I'm going to leave this series. I believe I've done enough to show that this approach to animals in CTA2 is viable and could make them more useful as it gives you the option to treat them as two legged characters as well.
Meow
ReplyDelete