
Learning Moho Pro 12 (Anime Studio Pro) - Part 3, Debut and Pro Videos 1-10

After learning the basics of Moho Pro 12 from SmithMicro's 15 Anime Studio Debut video tutorials in Part 2, I'm now moving on to the 26 video tutorials that cover features in both the Debut and Pro versions of Anime Studio (if you're wondering, these video tutorials are just rebadged Anime Studio tutorials included with my Moho 12 Pro purchase).

Like the Debut video tutorials the videos are not sorted into any logical order, making it extremely hard to know where to start and then what video to move onto next. I'm attempting to sort them into a logical order as I go. If you have the same tutorials I'll give you what I think is the ideal viewing order, possibly in my next post.

For now, I've only worked through ten of the twenty six videos in what I feel is a logical order, building upon what I've already learned. They are (shown by file name):

  1. Pro and Debut Video
    Tutorial Title Page
    Both - Help
  2. AS11_Both_Preferences
  3. Both - Tabs
  4. AS11_Both_Save_All_Tabs
  5. Both - Creating Shortcuts
  6. Both - Frame 0 Sequencer
  7. Both - Integrated Audio
  8. Both - Switch Layer
  9. Both - Lip Syncing
  10. Both - CharacterWizard

The first six cover mostly features of the User interface, such as the Help Menu, Preferences, Project Tabs, Creating Shortcut keys and a detailed look at how frame zero works on the timeline sequencer. All things to be aware of but not really a stretch to understand.

 The next three videos are more interesting, covering, Integrated Audio, Lip Syncing and the Character Wizard. Those will be the focus of this post.

Integrated Audio


Why they didn't just call this tutorial 'Audio Recording' is a mystery since that's the name of the feature it describes and is much clearer in terms of describing the subject.

Moho allows you to record any audio into your project through a dedicate recording window. It's pretty limited so if you want to do more with your sounds you can use your own audio recording software and import the results into the project.

Since Moho's tool has a Pitch Shifting slider it's clear the intention is to be a quick way to record character voices.

Recording your voice is fairly straight forward, press the record button, speak into your microphone, review the result, adjust the pitch if you wish, then add the audio to your project. The sound is then added as an audio layer.

If you want your audio to be a voice for a character you can move the audio layer into your character's Bone layer folder. I don't think this is essential but it makes sense from an organizational standpoint.

I used the audio recorder to voice my Alvin the Owl character (which I animated in the previous post).


Switch Layer


The Switch Layer tutorial shows how to set up switch layers and gives examples of how they might be used. Probably their most common use is in lip syncing where the mouth is switch between different versions to match the sound of the words being spoken. However switch layers can also be used anywhere you want to combine frame by frame animation with key frame animation.


Lip Syncing


In the lip syncing tutorial two methods are demonstrated. Moho has automatic lip syncing but it does require some set up of your character's mouth images for both, before you start.

The first method is easiest, and turns out to be ideally suited to a character like my owl, who has a fixed beak, meaning no lip movement, just varying states of 'open'. They don't name the technique but I'm going to call it the 'Linear' method.

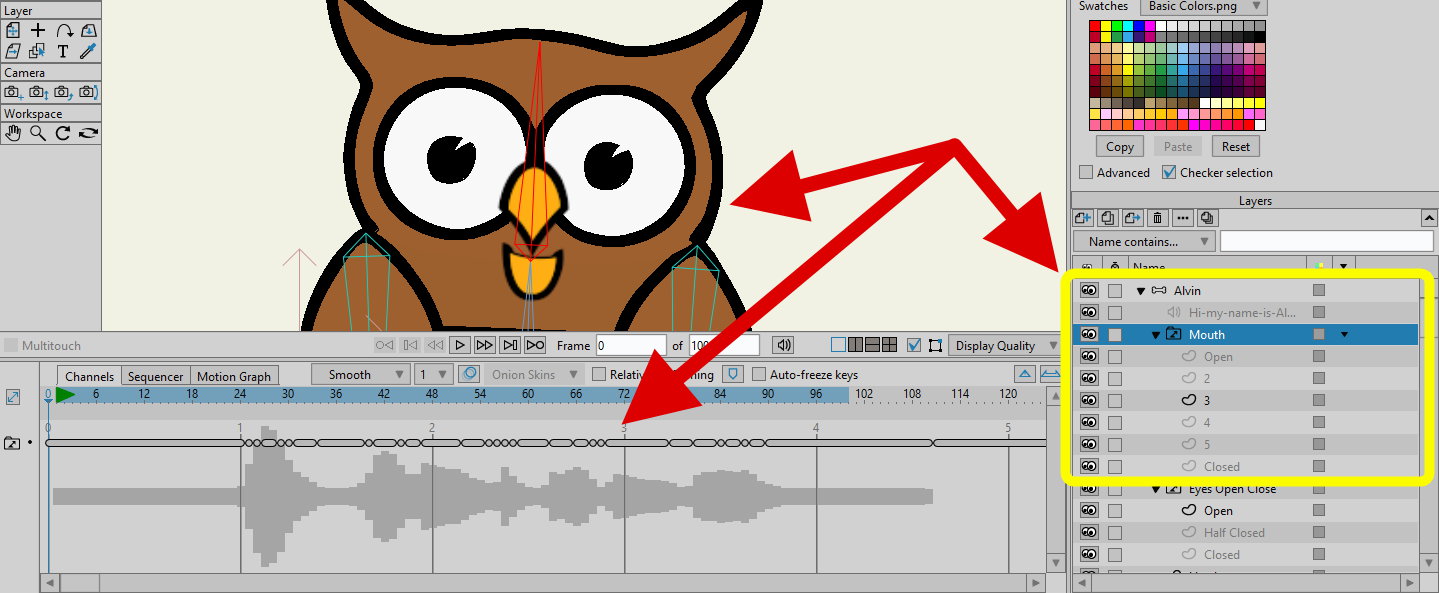
In the Linear method you set up a switch layer that contains images of your character's mouth, starting with wide open and progressing sequentially down to closed. The tutorial used five images, I used seven for Alvin (as you can see inside the yellow box surrounding the Layers palette in the image below). Alvin's mouth is shown half way open on image three of the switch layer.

From there it's just a case of going into the layer properties of your mouth switch layer and linking the audio source to the layer. Moho does the rest, calculating what mouth image should display based on the audio and creating all the key frames (also shown in the image below).

Lip Syncing using the direct Mouth Closed to Open, linear approach.

Once completed, you can move the key frames around if anything isn't quite right but for Alvin it was spot on.

Papagayo
For any character that has more human like lip movements the Linear method can be a bit clunky. That's where the Phonetic method comes in. Fortunately this method is made much simpler by a free lip syncing tool called Papagayo from SmithMicro - which I've written about in this blog previously, describing in detail how it works.

The preparation of your character is similar to the linear method except this time each mouth image is based on the shape your mouth forms when speaking specific phonetic sounds.

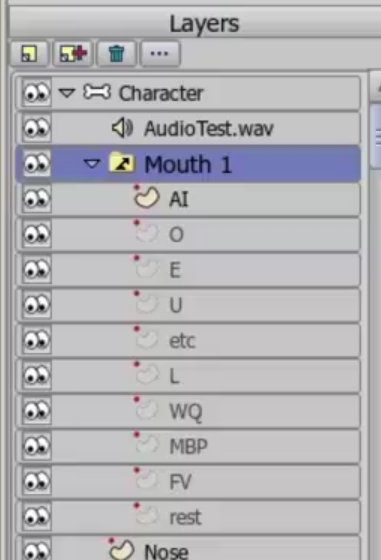
You can see the set up of the mouth switch layer in the image on the right. With ten images placed in the correct order, that includes mouth shapes for various sounds, you're likely to get a much more accurate lip sync than the linear method.

Once you've done the work in Papagayo (which includes some pre made mouth layers you can import if you don't want to draw your own mouths), you simply export your work there and import it into your Moho project, mouth switch layer as a .dat file.

Character Wizard


The Character Wizard. The Randomize button
will spew out some awful designs.
Moho's character wizard is a nice idea but if you ever want to see some truly awful character designs, fire this tool up and hit the Randomize button a few times.

The random characters look so bad that I can't really even imagine using them as a base to work off, that you might refine into something more suitable.

However, if you just want to throw together a quick character with your own thought out choices for how it will look, the character wizard is actually pretty useful. It's strengths are there is a lot of choice for different facial features and body types through the adjustment of sliders. It's biggest weakness is the complete lack of clothing choices. So lacking I can list them all here; long pants, short pants, short sleeve T-shirt or long sleeve T-shirt.

My TET Avatar created with
the Character Wizard.
It's other strength is that you can generate a character rig with a full range of views, front, back, three quarter etc. but, more often than not, the face you've designed in one view doesn't line up with the head in another view. Meaning you'll have to fix it once you've added the character to your project.

Finally, you can save your characters in the wizard, ready to bring into any project.

The test of a good character creator is whether you can create a likeness of someone. My go to someone is me, well, me as the character, The Extraordinary Tourist. I think I did okay with the face but, with no clothing options, the usual grey suit and black tie were out.

In the video below you can see a really quick animation I put together featuring my TET Avatar and Alvin the owl. TET's lip sync is done using the Phonetic method with Alvin's created using the Linear method. (I have to say both methods are actually very easy to get the hang of once your character's mouth switch layer is set up).


So far I'm two days and twenty four videos into learning Moho Pro 12 and I feel fairly confident that I could produce some relatively good animated shorts. However there is so much more to learn. In the next post I'll continue to work my way through the second batch of tutorial videos.

Comments

  1. i hated the character wizard at first because the reason you stated, its lack of choice!!

    however with the short options what you can do is add your own clothing! i was playing around a while and gave my character a skirt for example!! ^.^ you create the clothing yourself and then just add it to the layer, i put the skirt where 'belt' is in the layer list and it looked perfect

    ReplyDelete
  2. I imagine the character wizard is best used as a starting point for characters that you would definitely customize further outside of the wizard. It certainly saves you a lot of time in character rigging if nothing else.

    Good to see you're already into making your own customizations in such a short time learning Moho. That's definitely real progress. Well done.

    ReplyDelete

Post a Comment

This blog is monitored by a real human. Generic or unrelated spam comments with links to sites of dubious relativity may be DELETED.

I welcome, read, and respond to genuine comments relating to each post. If your comment isn't that save me some time by not posting it.

Popular posts from this blog

Inochi2D - Free Open Source 2D VTuber Avatar Rigging and Puppeteering Software (Part 1)

Inochi2D Creator - Free Open Source VTuber Software. If you've been looking for a way to live perform as a 2D cartoon avatar on camera, whether it be for a live stream or for pre-recorded content like educational videos, then VTuber software is a low cost (or even no cost) option worth looking into. In my previous post, How to Become a VTuber - 2D and 3D Software for Creating and Controlling Your Avatar , I took a brief look at the relatively new but completely free and open source Inochi2D  which I thought showed great potential for my own needs of creating a live performance character rig for my own TET Avatar that I use for all my promotional materials. While it is possible to live perform my character using Cartoon Animator itself, Reallusion's MotionLive2D capture system isn't great - with lip sync in particular. More importantly though, I can't exactly teach people how to use Cartoon Animator if I'm using Cartoon Animator to control my Avatar. What is Inochi2D

Dollars Mocap: Full Body Webcam Motion Capture (Including Hands and Fingers) For iClone and Cartoon Animator

Even though I should be further away from the camera Dollars Mocap MONO still does a good job of  tracking my arms, hands and fingers. Ever since I wrote my series on becoming a VTuber , discovering it was possible to do full body motion capture, including hands and fingers, with just software and a webcam, I've been on the look out for any motion capture software that can bring that functionality to Cartoon Animator. Dollars Mocap is a low cost motion capture application with a free trial that I learned about through the YouTube Channel Digital Puppets  and their test video . It can record full body, upper body, arms and hands, and facial mocap from a live video source or pre-recorded video. Investigating further, I discovered not only does Dollars Mocap have a free iClone7, iClone8 character profile file download (look for it at the bottom of the main program download page), so you can use the saved motions with iClone8, they've also got a demo video for how to convert your

Prome AI Sketch Render Tool - Your Tradigital Clean Up and Colorist Artist for Character and Background Design

Random character head, Biro sketches drawn by TET (left). Render by PromeAI (right) using Prome's Sketch Render tool set to 'Comon:Cartoon, Render Mode: Outline'. W hile I don't do New Year Resolutions, one of my plans for the year ahead is to do more of my own art. Specifically character design drawn in an actual, physical sketchbook.  To that end, I have been spending the last half hour of most days drawing a page or two of random biro sketches in my sketchbook and posting the pages to my Instagram account  (this link will take you to one of my posts). These sketches are mostly practicing my skills because I don't really draw regularly anymore. Here is a tip, if you do this kind of sketching, and push yourself to keep doing it, you will see many drawings that could be taken further, even if you don't have anything they're suited for just at the moment. Which is where my second favorite AI Image Tool (after Leonardo.ai )  PromeAI comes into play. PromeAI

Moho 14 Released - Still the Best 2D Animation Software for Indy Animators on a Budget

Moho 14 Released. Regular readers know I am a Reallusion, Cartoon Animator advocate through and through. Hands down I would recommend Cartoon Animator 5 first over Lost Marble's Moho 14 to anyone who is just starting in 2D animation, is a team of one, or just needs to animate as quickly as possible. However, feature for feature, Moho is, arguably, the best 2D animation software for the rest of us who can't justify a Toon Boom Harmony , or Adobe Creative Cloud subscription (and even with their applications Moho is very competitive on features). You can get started with Moho Debut for just USD$59.99 which is a cut down version of Moho Pro but it still has the most essential features needed for 2D animation. While Moho Pro is a whopping USD$399.99 (Cartoon Animator, which only has one version, is just USD$149.00) upgrades to new version numbers come down to a quarter of the price at USD$99.00. Even though Reallusion just released features like Motion Pilot Puppet Animation and

Wonder Unit Storyboarder - Free Storyboarding Software for People Who Can (or Can't) Draw

Wonder Unit Storyboarder.  As an independent and solo animator I'm always tempted to try and skip storyboarding my animated shorts because they're usually only single scene sketch comedy type jokes. As a result I have many unfinished projects that kind of petered out due to having no clear finishing line. Storyboarding your productions, no matter how small, gives you a step by step guide of every shot that needs to be completed (no planning shots as you animate). It also allows you to create an animatic that gives you a rough preview of the finished production. In short, you shouldn't skip storyboards as they, generally, increase the chance of the project being completed. Disclaimer - I'm Not a Fan of Storyboarder Upfront, Wonder Unit's Storyboarder  is not my preferred storyboarding software. However it's completely free, has a number of very compelling featu

Start Your 2D Animation Side Hustle - Sell Your Cartoon Animator Characters, Props, Scenes, and Motion Files in the Reallusion 2D/3D Marketplace

Have you thought about starting a side hustle selling your original Cartoon Animator assets in the Reallusion 2D/3D Marketplace ? In this article, the first in a series on selling in the marketplace, I'll give you an overview of what's involved, why you should give it some thought, and whether you can earn enough to quit your day job (or at least have a worthwhile side hustle). If you're an artist with any kind of drawing skills, and you're creating your own original characters, props, scenes, and even motion files for your Cartoon Animator projects, then setting up your own store in the Reallusion Marketplace should be a no brainer. You're making content already, it doesn't cost you anything to set up, and Reallusion only takes a 30% commission from each item sold. (If you think that's a lot, I'll address that further down). Don't be put off if you think your art skills aren't up to professional standards. There are plenty of artists with naïve

Can't Draw Characters? Create Highly Detailed Characters from Simple Drawings and Prompts Free with Realtime Canvas by Leonardo.AI

Leonardo.ai's   Realtime Canvas. Create highly detailed images from simple drawings. I f you've had an idea for a character but don't have the artistic skill to design it yourself, or the budget to hire someone to do the design work for you, then Leonardo.ai's Realtime Canvas may be your new creative partner. Sure you could use Leonardo.ai's regular text prompt to image generator but that can be very hit and miss, and may take many generations before you finally craft a complex prompt that's getting something close to what you had in mind. Realtime Canvas, on the other hand, lets you craft a simple text prompt and draw a rough image, both of which you can keep refining until you get a final, real time, updated image that looks close to (and probably better than) what you had in mind. Using Realtime Canvas Once you've signed up for a free account with Leonardo.ai  (which will give you 150 free credits, renewed daily), click on Realtime Canvas, from the side