

 |
| Renderforest Whiteboard Animation Toolkit. |
Though, technically drawing on a whiteboard isn't animation any online video employing that style of technique is usually referred to as Whiteboard Animation.
The popularity of Whiteboard Animation saw the process of creating them become automated with simulated whiteboard animation. In a simulation a still, photographic image of a hand holding a marker, is moved around an image as it is 'drawn' on a usually white background.
Generally, if the image being drawn looks hand drawn, and the hand actually follows the lines as they are being drawn it looks almost as interesting as an actual real hand drawing on a whiteboard. However the illusion can be ruined if the hand is speed drawing perfectly formed lettering in a non hand drawn font, or worse is speed drawing photographs.
Renderforest's Whiteboard Animation Toolkit is one such simulator that I thought I'd put to the test. Does it draw its images realistically, and how versatile is it? Can you have it draw anything?
I first reviewed video creation site Renderforest back in November of 2017, and have also reviewed their 3D Explainer Toolkit. Even if Whiteboard animation may not be what you're looking for Renderforest has toolkit/templates to suit almost any video need from logo stings and music visualizations, through to complete video templates that can be highly customized with your own content. Click here to browse their template library.
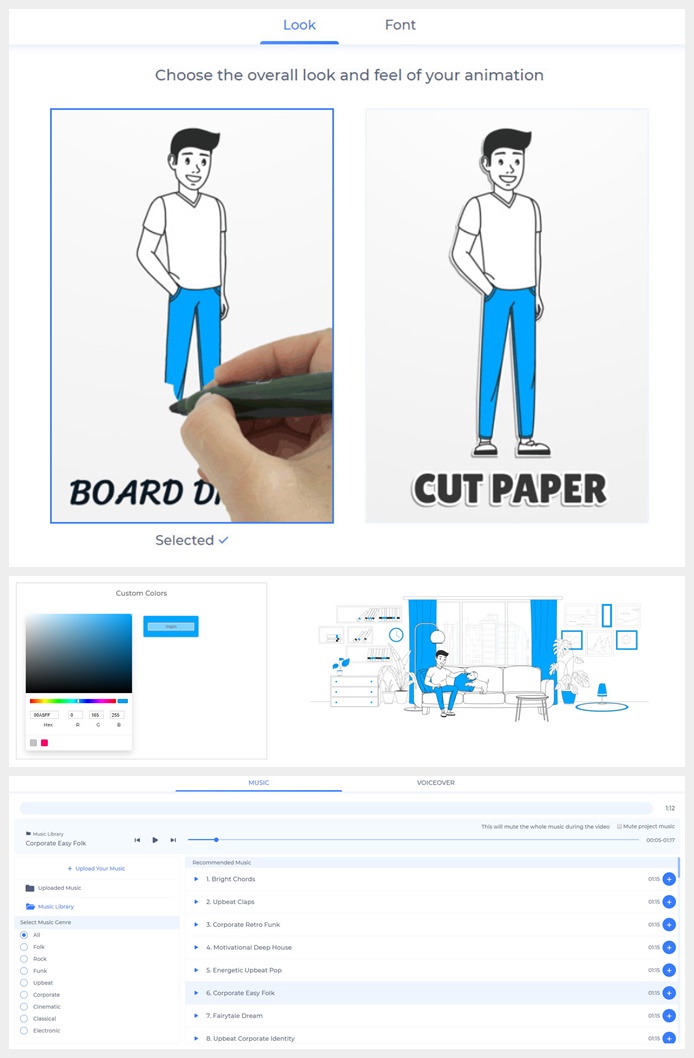 |
| Global animation customizations in Renderforest's Studio. |
Almost everything is done for you other than arranging and customizing the scenes. While you can still make a dog's breakfast of everything if you have no flair for design whatsoever, most people should be able to achieve relatively professional looking results quickly.
The Whiteboard Animation Toolkit includes 900 scenes in many different categories e.g. Male Character Animations, Female Character Animations, Occupations (Male Characters), Occupations (Female Characters) etc. giving you a lot of options and combinations.
When you open the studio you are given three options:
- Load a preset script - by far the easiest option, this is a complete video focussed on a specific generic topic, such as Product, Service, or Education, and more, that you can customize to suit your specific needs. Most useful for very general promotions focussed on broad ideas.
- Add My Script - This is the option I tried because I'd done this for my review of their 3D Explainer Toolkit and was interested to see how the Whiteboard version would compare.
Enter your text script into the text entry box and the studio will break it down into scenes, automatically choosing templates for each scene based upon keywords from each line of your script. All your script's text will be included onscreen throughout the animation.
- Add Scene - essentially this is as close to starting from scratch as you can get. Choose you first scene, customize it, choose your next scene, customize it, etc. etc.
As I mentioned I started with option 2 and wasn't as impressed as I had been with the 3D Explainer Toolkit. Although the automatically chosen scenes kind of worked they we're so generic that they could have been for any business.
Initially, when I decided to edit the auto generated animation, I thought maybe I'd tweak one or two scenes, but ended up changing every single scene for something else. Effectively creating my animation from scratch.
Below is my result, a short promotional video for my Animation 4 Business service, after my customizations and scene changes. I used the exact same script as I did for the 3D Explainer Toolkit.
As you can see this video is a low resolution, watermarked, free version of the animation. I wasn't prepared to pay for a higher resolution, unwatermarked version because, and I think you'll agree, the simulated whiteboard is embarrassingly terrible.
The images are perfectly fine, it's just the way the hand actually draws everything is so badly done it's not even drawing the lines that reveal the drawing. There's no real attempt here to try and maintain any kind of illusion that the hand is drawing anything. It clearly isn't and it takes you out of why whiteboard animations are engaging in the first place.
As a result I would never use Renderforest's Whiteboard Animation Template for this style of animation where the images are 'drawn' on screen.
However...
With one click of the animation style selection screen you can turn your whiteboard 'drawn' animation into a whiteboard 'cut out' animation. In this style of whiteboard video all the elements look like they have been cut out from a sheet of paper and are slid into place by a hand.Watch my cut out version of the same video with no changes other than a single click to change the whole style to cut out.
The above video is still a low res, watermarked, free version of my video but I think you'll agree it's a vast improvement over the 'drawn' version. It feels more watchable as the hands sliding things into place feel a little more authentic (as much as a simulation can) than the poorly implemented 'drawing' hands of the previous version.
I could see myself utilising the whiteboard cut out style for sure.
Overall, I think Renderforest's Whiteboard Animation Toolkit isn't a great simulation of a whiteboard animation. In fact I'd steer well clear of using the 'drawn' style of whiteboard in this template as it's only engaging in the sense that your viewers will be noticing just how bad it is.
That said, the cut out style saves the toolkit by easily representing a good simulation of paper cutouts being slid in and out of frame. It looks much more professional and engaging for the right reasons.
Of course you do still have the limitations of being very restricted to what template scenes are available and whether they can be adapted to your specific needs. You'll notice my animation is still very generic and not particularly specific to animated explainer videos with its imagery.
As with the 3D Explainer Toolkit, the more specific the information you need to present the more compromises you'll make to bring your script to life. You may find yourself using a lot more animated text scenes with dot points, or including more of your own custom images inserted into those template scenes that have placeholders for such custom content.
If you are really looking for a good simulation of a 'drawn' whiteboard animation then I still haven't come across one that's better than Vyond's Whiteboard theme, which is optimised with images that do look like they are actually being drawn, and they have a much bigger and more adaptable library of images and characters.
Renderforest's toolkits are all free to use. You can purchase a monthly subscription (to remove the watermark) if buying an annual subscription seems like more than you want to spend right now.
It is worth looking at the subscription options as you gain features like longer videos, more storage space, more music tracks, etc., and don't forget, this is just one theme/toolkit from hundreds available for all kinds of video applications... and they have tools to assist with logo and website design too.
Visit Renderforest to check out all their Design Tools and Video Toolkits.
Disclaimer
This article contains Renderforest affiliate links but is not paid for or sponsored by Renderforest.
This article contains Renderforest affiliate links but is not paid for or sponsored by Renderforest.
The views expressed are my own.
Comments
Post a Comment
This blog is monitored by a real human. Generic or unrelated spam comments with links to sites of dubious relativity may be DELETED.
I welcome, read, and respond to genuine comments relating to each post. If your comment isn't that save me some time by not posting it.