

One of the often overlooked strengths of Cartoon Animator is how easy it is to make new characters simply by mixing and matching elements from existing characters you already own. This ability is possible because of the standardized G3 Human template.
Note that it is also possible to mix and match G1 and G2 character elements with themselves but, generally you can't mix G1 with G2 elements or G1 and G2 elements with G3 character elements. There are some exceptions but for the least amount of quirks and frustration, I'll be demonstrating mixing and matching G3 character elements only.
For best results, mix and match characters elements from the same or similar character range (i.e. those that have the same or similar artwork styles). This will usually help ensure most elements are positioned correctly without the need for too much adjustment.
The Simplest Method
Want to give a character a new outfit or create another character wearing the same outfit? Just swap heads. As shown in the image below it's as simple as placing a character on the stage, saving the head to the Custom > Actor > Heads folder, then putting another character on the stage that you want to replace the head on.
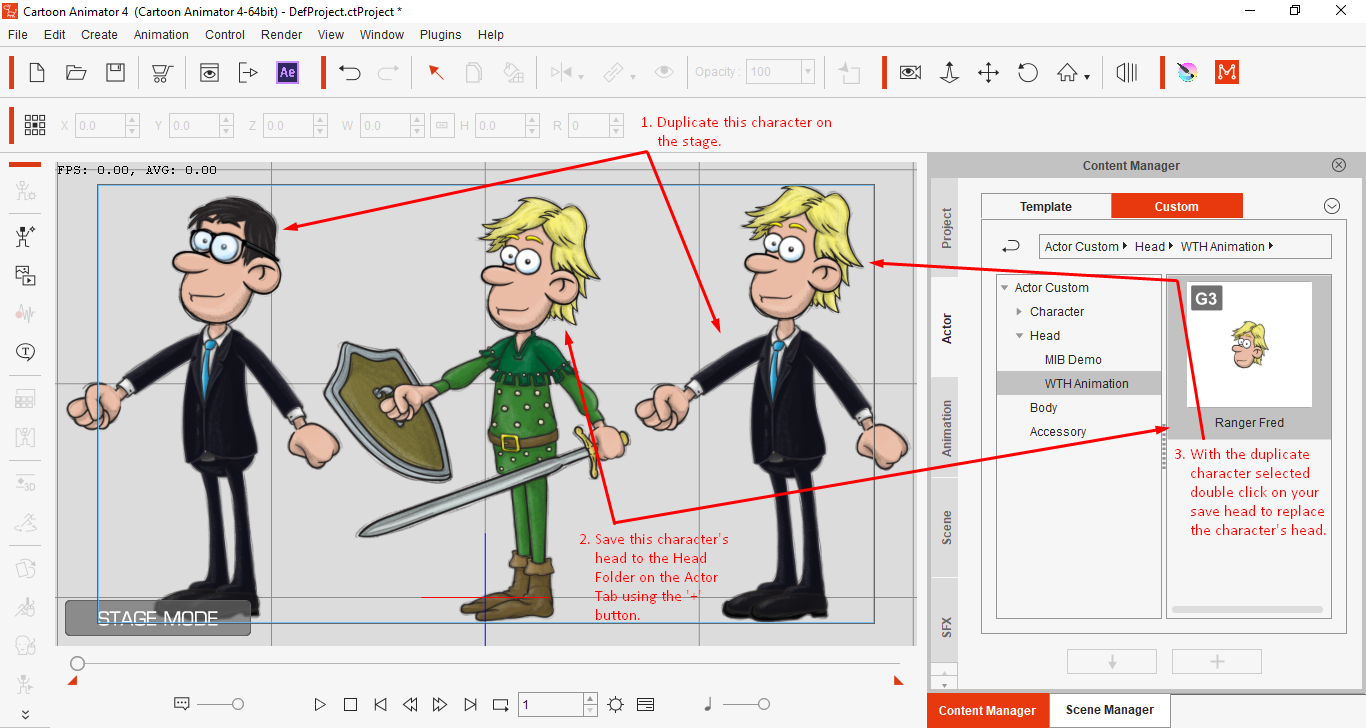 |
| Swapping heads is the simplest way to create new characters or change a character's outfit. For best results use characters with the same or similar art styles. Fred Fallen and Ranger Fred Characters by WTH Animation. |
The Character Composer
The next level of mashing up your G3 characters into new variations is to open your character into Cartoon Animator's Character Composer. Here you can save and swap hair, facial features, hands, and add props and other accessories.
Be aware that the Character Composer will show you content intended for G1 and G2 characters that mostly likely won't be compatible with your G3 character (to the point where attempting to add them may crash the program), however if you stick with G3 content you should be okay.
Character Body Mashups
 |
| For G3 Characters only hands can be saved and swapped on the Body Tab in the Character Composer. |
In terms of the character body, the main switch you can make is with hands. There are various sets of sprite hands to choose from and you can swap out sprite hands for bone hands.
Save hand sets to your custom hands folder if you want to add them to another character (You'll know what features can be saved out by selecting one of your custom folders. If the '+' button becomes active that feature can be saved and swapped).
Character Face Mashups G3 Standard and G3-360
The Character Composer will let you mix and match G3 Standard Head components and G3-360 Head Components to varying degrees of success. For the most trouble free, predictable results don't mix G3 standard head and G3-360 head components, and stick to characters facing the same angle and within the same set of character art styles.
 |
| Before mashing up facial components for characters from a developer's series you may need to open a few in the Character Composer and save out the features you want to swap onto other characters. |
For example, for this article I'm demonstrating with WTH Animation's Cast & Crew series of characters. All of them use the same standard body/head base and bone placement so, in theory, I should be able to mix and match features with little to no tweaking for scale or placement.
A simple method to see how things are going with your face mashup is to use the Modify > Face Calibration tool to see if a feature is working. If it doesn't just click the undo button (or make adjustments if it just needs minor tweaks).
Scale and resize things by selecting the bone of a part you want to change and adjust the handles on the edge of the blue square. You can also scale, resize, and adjust a sprite's position on the bone using the sprite editor tool (this will change the sprite without affecting the bone).
Incidentally if you are mashing up characters from a marketplace developer like WTH Animation you may have to bring a few characters into the Character Composer first, and save out their facial features to your Custom > Head tab content folders. That way you'll have the components ready to swap whenever you need them.
Just like with the Body tab you'll be able to see which features you can save to which folders through the '+' button becoming active.
Adding Props and Layer Adjusting
 |
| In this image I've added a shoulder bag prop to my character and moved it down the layer list so the left arm and hand will remain in front of the bag. |
If you want a prop to become a part of your character (i.e. is saved with the character) and be on the correct layer in relation to the rest of your character (e.g. a prop held in the characters leading hand so it appears behind the hand but in front of the body) then you need to add it in the Character Composer.
Drag the prop you want to add over the bone you want it to be attached to. The bone will change color indicating it is selected so let go of the mouse button.
You'll then need to drag the item up or down the list in the Layer tab to make sure it is on he right layer in relation to everything else.
Exporting to Your Linked Graphics Editor
This is the most advanced level of character mashups short of making characters entirely from scratch. The reason you may need to export your character is to customize any feature colors e.g. hair, skin, clothing etc. or maybe you want to modify an outfit, change the shape of your character's face etc.
To export a character you need to have selected a graphics editor that Cartoon Animator is linked to in the application's preferences. Then you just click the Launch PSD Editor button. In most cases the default settings in the window that appears of Head and Body in One file and Edit Current Angle should be fine. Then click Launch.
At this point Cartoon Animator and your graphics editor will be linked. Anytime you click Save (not Save As) in your editor the changes will be saved in Cartoon Animator as well. Should they become unlinked you'll need to Save As your template from your graphics editor to somewhere you can easily locate it, and then reimport it into Cartoon Animator via the Character Composer using the Import PSD Assets button.
 |
| Here I'm using my linked PSD Graphics Editor, Krita, to change the color of my character's hair and suit. |
In your graphics editor you can make almost any changes you like however you must keep the layer structure and folder names exactly the same. If you add new layers in the course of making edits be sure to merge those layers back down to the original layers before saving. Delete any folders or layers you created that are not part of the original template. Flatten any filter effects, and rasterize any vectors.
Experiment
It's worth spending the time just experimenting with the Character Composer to see how many characters you can make without ever needing to export anything to your graphics editor.
While I have recommended not mashing up different art styles that doesn't mean you shouldn't try it as you gain more confidence. Sometimes combining two art styles in a consistent way can create a whole new look. I actually combine similar art styles all the time with my own custom characters. I just don't think you should do this until you get more of a feel for how the Character Composer works.
Definitely try out some of the other Character Composer tools not mentioned such as the Mask Editor, 360 head tool and more. The more familiar you become with the Composer the easier creating character mashups becomes.
Comments
Post a Comment
This blog is monitored by a real human. Generic or unrelated spam comments with links to sites of dubious relativity may be DELETED.
I welcome, read, and respond to genuine comments relating to each post. If your comment isn't that save me some time by not posting it.