
How to Create Whiteboard Animation in Reallusion's Cartoon Animator 5 Tutorial - Concepts, Video, and Project Files

Whiteboard Marker Hand drawing a cat.
This animation technique allows the creation of
whiteboard animations inside Cartoon Animator 5
without having to create frame by frame animation
of your images being drawn
Something I've been thinking about for literal years is how to create whiteboard animations using Reallusion's Cartoon Animator to do the animation.

Specifically, looking for an easy way that doesn't involve any kind of frame by frame animation of images being drawn. Finally I think I've solved it with a technique that you can replicate.

The release of Cartoon Animator 5 gave us two new features, Spring Bones and Free Form Deformations (FFD), which have made it very possible to create your own, fairly convincing, whiteboard animations directly in the software itself.

Adding spring bones to the arm/hand prop, makes it look less stiff and more natural without having to do any extra work. While FFD makes it easy enough to 'reveal' whatever is being drawn with a little bit of sleight of hand (pun intended) trickery so you don't have to draw every line of your images.

Watch the Video Tutorial

(Also available to buy with project file and props included).

To show you my process I've created this 40 minute (approx) video tutorial in which I demonstrate  how I create and rig my hand prop, and how I animate writing text and drawing images in Cartoon Animator. If you don't have the time to watch right now I have broken down the basic concepts you need to know below the video.


Project files 

The Project Files and Props for Cartoon Animator, that were created in this tutorial, are available from my online store so you can study and use them in your own animations (personal and commercial use). You'll also be able to download this video and watch it offline whenever you want.

Key Concepts

The Hand Prop

Creating a hand prop is as simple as taking a photo of your own arm holding a marker on a plain but high contrast background - so it's easy to remove the background using any automatic background removal tool. I used a green screen background but I would recommend maybe a high contrast red as I had a lot of trouble getting rid of the green tint reflected onto my arm.

You also want to hold the marker so that the pen tip is not visible. It's much easier to hide that you're not drawing everything if people can't actually see the 'ink' coming out of the pen tip.

Rigged Marker Hand Prop in the Composer showing the Spring Bone Settings.
The fully rigged marker hand prop with three main
bones. Notice that the spring bones are only from
the wrist and use the 'Stiff' preset.
Once you have your transparent marker hand image drag it onto Cartoon Animator's stage and import it as a rigged prop. This will take you straight to the composer where you can resize the image and add your spring bones.

The Spring bones are key to making the animation look a little more natural. They cause the hand to move a little bit past the end of the line being drawn like a real person would when they lift the pen from the page. The best thing being, it just happens. You never have to think about animating it.

Animating Whiteboard Text

Animating the hand writing text is relatively easy if you're writing from left to right. For the most part you can use the hand to mask each letter as it is drawn. The viewer only sees each letter after it has been drawn, as the hand moves onto the next letter.

Using Cartoon Animator's Text Tool to manage written text appearing.
In the Text Editor create a line for each new
letter to switch to as it appears. Importantly,
use a hand written style font and make sure
each line is left justified.
Cartoon Animator's Text Tool is ideal for this. Importantly, choose a hand written font to further sell the idea that the text is really being drawn. Inside the Text Editor create a new line for each letter as it is added until you have the whole word, phrase, or sentence written on the last line.

Also important, the text should be left justified so it always lines up as you switch to the next letter.

Key frame the hand using the Prop Key editor and move the arm bone, making sure the pen lines up with the text for each key. 

You can pretty much trace the text the way it would be written. Place keys on the start and end points of each line. If a line is curved add an extra key for the mid point of a curve.

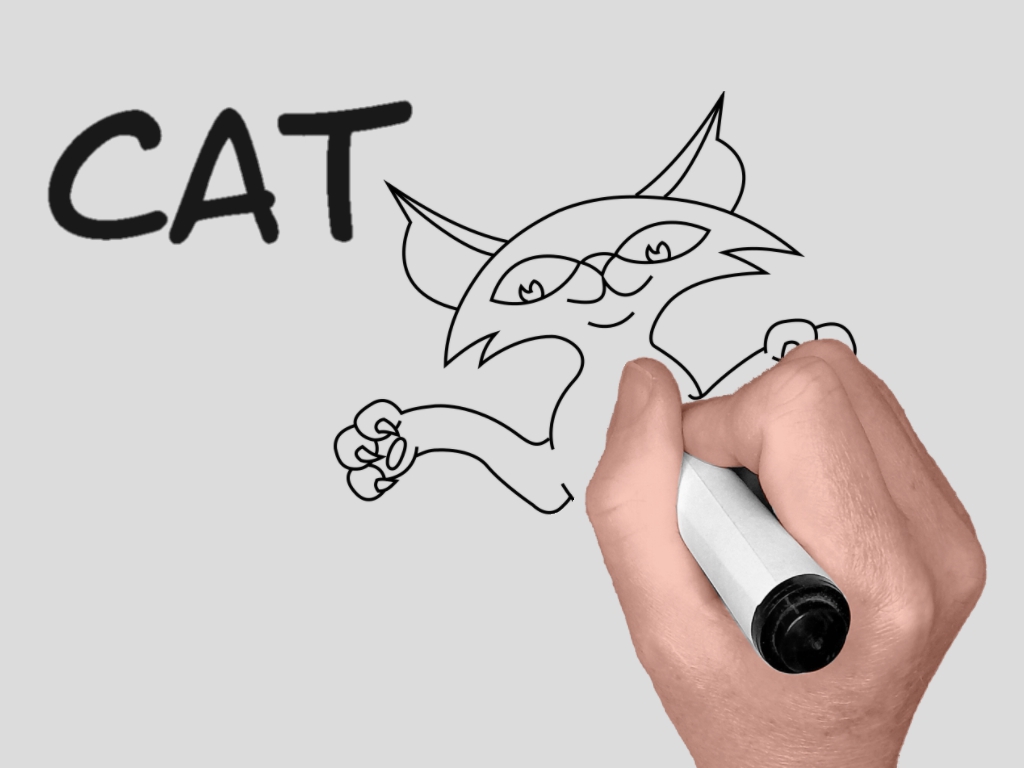
Animating Whiteboard Images

Animating images being drawn is a little more complex and I would recommend not using drawings that are too highly detailed as it spoils the illusion. Use images that you could reasonably imagine someone drawing relatively quickly with no underlying sketching/construction lines.

Once you have your complete image imported into Cartoon Animator as a prop you'll need  to plan how you're going to 'draw' the image and create shape masks (the same color as the whiteboard) to follow that sequence.

Masking the image with shapes.
Here I've used several rectangle shapes to
mask out my image. I've set the opacity to
70% so I can see the image beneath while
I key frame the reveal.
You could mask out the image with one single shape but I've found using several shapes over different areas of detail gives you more control over how the image is revealed.

While you could literally draw your image in any sequence, more like an actual human would draw the image, the fastest method, that still looks convincing, is to start in the top left corner and work your way down to the bottom right corner of the image.

This allows you to use less complicated masking and maximises how much you can use the hand to hide lines as they are 'drawn'.

I recommend only key framing the broad shapes, similar to how you key frame text. Key the start and end points of straight lines. For any curved lines, key a mid point for the curve.

How far apart you place the keys in the timeline depends on how fast you want the image to be drawn. I spaced mine every five frames.

Adding a Stutter Start transition to key frames near areas of detail.
By adding a 'Stutter Start' transition to key
frames near areas with more detail you can
imply more detail is being drawn as the 
stutter causes the spring bone to move
around more in these areas.
For areas that do have fine detail you want to just reveal the detail as the major shapes around them are being drawn. 

You can give a hint that the finer detail is being added, without actually key framing tracing the detail by adding in a ' Stutter Start' transition curve to each key frame in that area. This will cause the hand to bounce around a little more, activating the spring bones, making it look like more drawing of details is happening in that location than you've actually animated.

Using FFD to animate the mask shapes that reveal the image underneath.
Using the FFD editor to deform the mask
shapes out of the way. You can largely ignore
the editor window as you'll need to manually
move all the points around depending
upon your images.
Once you've key framed how the image will be drawn the next step is to key frame the mask shapes moving out the way as each area is being drawn. 

To do that open the FFD editor. You can literally ignore everything in the editor window as the only way to key frame the reveal is to manually move the individual points yourself, deforming the shape to reveal the next major line being drawn.

Through out the whole process of key framing I set the opacity of the arm and the masks to about 70% so I can see everything clearly as I work. Then I change the masks to the whiteboard color and set all the opacities back to 100%.

Final Thoughts

I will concede this is not the fastest way to create whiteboard animation. While I feel it does look great, it's very time consuming. Using this technique on an entire two to three minute explainer video could be quite monotonous.

If you're only ever making a whiteboard animation once in a while, it is good to know Cartoon Animator is more than capable. However, if you were making whiteboard videos regularly, I would definitely consider a dedicated whiteboard solution like Vyond or Doodly (not sponsored or an affiliate they're just two of the best). Neither of them have the nice spring bone touch in the wrist on their hands but they will save you a lot of time.

Click the link to purchase:
(Includes CTA5 Project File and Props)


Comments

Popular posts from this blog

Inochi2D - Free Open Source 2D VTuber Avatar Rigging and Puppeteering Software (Part 1)

Inochi2D Creator - Free Open Source VTuber Software. If you've been looking for a way to live perform as a 2D cartoon avatar on camera, whether it be for a live stream or for pre-recorded content like educational videos, then VTuber software is a low cost (or even no cost) option worth looking into. In my previous post, How to Become a VTuber - 2D and 3D Software for Creating and Controlling Your Avatar , I took a brief look at the relatively new but completely free and open source Inochi2D  which I thought showed great potential for my own needs of creating a live performance character rig for my own TET Avatar that I use for all my promotional materials. While it is possible to live perform my character using Cartoon Animator itself, Reallusion's MotionLive2D capture system isn't great - with lip sync in particular. More importantly though, I can't exactly teach people how to use Cartoon Animator if I'm using Cartoon Animator to control my Avatar. What is Inochi2D

Eric W. Schwartz: Cartoonist, Animator and Amiga Die Hard

July 1992 Edition, CU Amiga Featuring Amy the Squirrel. American Cartoonist, Eric W. Schwartz , (whose unofficial Amiga Icon, Amy the Squirrel, is pictured on the July 92 edition of CU Amiga cover on the right) is my only real animation hero. Sure there are the big names like Disney , Chuck Jones , Tex Avery and even Preston Blair whose influences can all be seen in my own cartoons but Eric did what none of the others could. He showed that really great 2D computer animation was within my reach with little more than an Amiga Computer , a copy of Deluxe Paint and Moviesetter . This was at a time when computer based animation was in its infancy (outside of computer game animation) and Flash was something that lights did. There were many great Amiga artists but Eric was really the only one consistently making very funny, traditional style animations. His humor and drawing style is heavily influenced by classic Warner Brothers and Disney cartoons but he managed to build on this,

Wonder Unit Storyboarder - Free Storyboarding Software for People Who Can (or Can't) Draw

Wonder Unit Storyboarder.  As an independent and solo animator I'm always tempted to try and skip storyboarding my animated shorts because they're usually only single scene sketch comedy type jokes. As a result I have many unfinished projects that kind of petered out due to having no clear finishing line. Storyboarding your productions, no matter how small, gives you a step by step guide of every shot that needs to be completed (no planning shots as you animate). It also allows you to create an animatic that gives you a rough preview of the finished production. In short, you shouldn't skip storyboards as they, generally, increase the chance of the project being completed. Disclaimer - I'm Not a Fan of Storyboarder Upfront, Wonder Unit's Storyboarder  is not my preferred storyboarding software. However it's completely free, has a number of very compelling featu

Can You Learn Reallusion's Cartoon Animator 5 for Free Using Their 137 Official YouTube Video Tutorials Sorted Into a Logical Learning Order?

Or you could just buy The Lazy Animator Beginner's Guide to Cartoon Animator . While Reallusion's Cartoon Animator is one of the easiest 2D animation studios to get up and running with quickly, learning it from all of the official, free, video tutorials can be more overwhelming than helpful. With more than 137 videos totaling more than 28 and a half hours of tutorials, spread across three generations of the software (Cartoon Animator 3 through 5) it's hard to know if what you're learning is a current or legacy feature that you either need to know or can be skipped. Many of the official tutorials only teach specific features of the software and don't relate at all to previous or later tutorials. As a result there are many features either not mentioned or are hard to find. To make your learning easier, on this page, I've collected together all of the essential, official, free video tutorials and sorted them into a learning order that makes sense. Simply start at

Dollars Mocap: Full Body Webcam Motion Capture (Including Hands and Fingers) For iClone and Cartoon Animator

Even though I should be further away from the camera Dollars Mocap MONO still does a good job of  tracking my arms, hands and fingers. Ever since I wrote my series on becoming a VTuber , discovering it was possible to do full body motion capture, including hands and fingers, with just software and a webcam, I've been on the look out for any motion capture software that can bring that functionality to Cartoon Animator. Dollars Mocap is a low cost motion capture application with a free trial that I learned about through the YouTube Channel Digital Puppets  and their test video . It can record full body, upper body, arms and hands, and facial mocap from a live video source or pre-recorded video. Investigating further, I discovered not only does Dollars Mocap have a free iClone7, iClone8 character profile file download (look for it at the bottom of the main program download page), so you can use the saved motions with iClone8, they've also got a demo video for how to convert your

Creating an AI Digital Avatar and Voice Clone of Myself with Free and Low Cost AI Tools

O ver the years I've looked at various ways of creating and animating a digital avatar, from simply creating a character for Cartoon Animator and voicing and animating it myself, to creating a  live motion capture ready Vtuber avatar puppeted and voiced by me in real-time. In the last year or so, making photographic images talk, using AI and AI voice cloning has really progressed. To the point where I wondered if I could create a photographic AI avatar of myself, complete with my cloned voice, that I might use on some of my videos? Creating My Avatar: Artflow To create my avatar image, as far as I'm concerned,  Artflow.ai is the best value AI site for creating consistent digital characters (or 'actors' as Artflow calls them). That's pretty much their entire focus. Artflow's actor model training user interface. You get your first actor for free, 100 free credits per month (which equates to 100 still images per month - get an additional 50 credits if you sign

Moho 14 Released - Still the Best 2D Animation Software for Indy Animators on a Budget

Moho 14 Released. Regular readers know I am a Reallusion, Cartoon Animator advocate through and through. Hands down I would recommend Cartoon Animator 5 first over Lost Marble's Moho 14 to anyone who is just starting in 2D animation, is a team of one, or just needs to animate as quickly as possible. However, feature for feature, Moho is, arguably, the best 2D animation software for the rest of us who can't justify a Toon Boom Harmony , or Adobe Creative Cloud subscription (and even with their applications Moho is very competitive on features). You can get started with Moho Debut for just USD$59.99 which is a cut down version of Moho Pro but it still has the most essential features needed for 2D animation. While Moho Pro is a whopping USD$399.99 (Cartoon Animator, which only has one version, is just USD$149.00) upgrades to new version numbers come down to a quarter of the price at USD$99.00. Even though Reallusion just released features like Motion Pilot Puppet Animation and