

I've watched a lot of these shows on GoAnimate and a common technique is to send off the same list of generic questions to every guest. Things like...
- Why did you start using GoAnimate?
- What is a favorite animation of yours?
- Who is your favorite animator on GoAnimate?
- What is your favorite animation on GoAnimate?
There's nothing wrong with these type of generic questions in themselves and it's not wrong to ask them. However, when you get a whole list of these questions in a row and you ask them of every guest, it makes for a very impersonal interview. Especially if you have more than one guest on the same show. It makes the interviewer appear lazy.
Interview shows are all about giving the viewer a personal experience with your guests. They want to see you connect with your guests with questions that draw out information and really tells them something specific about that person. Your viewers will especially enjoy your interviews if you get insights about your guests that they've never heard anywhere else.
Research!
The most important part of your interview show is researching your guests before sending them any questions. If you're interviewing a creative person such as a GoAnimator a good structure for your research is:
- Early work
- Popular work (Look for which animations have the most views/recommends)
- Current work
As you watch examples of their work think about questions you would like to ask about each. Try to be specific. For example, if you look at my very first animation, it's an unsuspecting cat getting squashed by a giant foot (hilarious right?). Perfect opportunity to ask one very generic question but personalized to me..
- Your first animation was rather unusual, what inspired it?
To which I might answer...
Yeah, it was a cute cat getting squashed by a giant foot... I made that animation really just to try out creating and importing my own props. I'm a huge Monty Python fan so I tracked down the image of cupid's foot, that Monty Python used in their show.
They used to just randomly drop the foot into a sketch as an unexpected joke ending - which is what I did, kind of, with my animation. It's funny because it's silly. Like a piano falling out of nowhere onto a protagonist- which is a classic comedy joke.Hopefully you get the idea. Look at what your guests have created and ask questions relating to specific work that they have done. Ask smaller questions so you can get to the detail quicker. For example, instead of asking me...
- Why do you think your Complaints Department series is so popular?
Why not ask...
- Of all the characters on GoAnimate, why did you choose Happy Bunny to be the one behind the Complaints Desk?
There's nothing wrong with the first question but I can only speculate on the answer. However, the second question I can give you a specific answer because I know exactly why I chose Happy Bunny.
What to Ask?
Interview shows on GoAnimate are typically short, usually 3-5 minutes. Although you can try, it's pretty hard to cover someone's entire body of creative work in that time. Especially if you want to get good answers of more than a few words.
Not only that but you, as the interviewer, may have no interest in your guests early work - or even their latest work. Which is okay. Ask questions about what you find interesting about your guests (based on your research).
If you're a fan of just one animation or animation series then focus all your questions around that. Ask the questions that you always wanted to ask. Just let your audience know first that your interview will focus on that specific body of work.
Your show will come across as more interesting and personal if you have a genuine interest in your guests rather than asking everyone the same questions like a robot.
How many questions you ask depends on how much time you have. I'd recommend a minimum of five questions to make an interview worth while.
Contacting Your Guests
The beauty of an animation interview show is that nobody has to leave home to create them. Questions and answers can be recorded separately when it's convenient for each person and then compiled together in the final show.
Keeping in mind that your guests are going to have to take time out of their day, and maybe even set up some equipment to record their voice (if you want their actual spoken answers), be sure to invite your guests to be on your show politely.
In your contact message you should introduce your show, perhaps list some guests you've already featured, and ask if they would like to be on the show. Send along the questions you want answered and explain what format you want the answers (as text or recorded voice).
Don't get upset if they decline. People are often busy, don't like recording their own voice or they may not want to answer your questions. Whatever the reason just accept it and maybe ask them again at a future time. Who knows, you may have just caught them in a mood or with an exceptionally large work load and little time.
Note that all audio for your show should be recorded as MP3 files. You'll need to provide an email address or some other means for your guest to send you their recording as an attachment or download.
Mic Check - Audio Fixing
Sound quality is quite important on an interview show. With all your guests using different microphones and environments to record their audio there are a few things you can do to get better audio.
The ideal way to get good audio is to record it under the best circumstances possible.
Encourage your guests to record their audio in a room that doesn't echo (generally a room that has carpet floors and closed, material curtains) with little to no background noise. Ask them not to position the microphone too close to their mouth. Ideally the microphone should be at least 2-3 inches away from their mouth. More if it's a particularly sensitive mic.
After you have receive the audio break out your audio software. I use Audacity but the two effects I'm about to show you can be found in most dedicated audio software and even some video editing software.
 |
| Audacity's Noise Removal tool. The default setting will (shown) usually do the job quite well. |
Before doing anything else with your audio (such as cutting it up into separate answers) open the files in Audicity.
Look at the sound wave in sections when your guest isn't speaking. If the line isn't for the most part flat then this indicates background noise has been recorded. It could be the hissing of the microphone or the sound of a fan (if the audio was recorded on a laptop microphone for example). You can reduce this noise to almost zero by using Audacity's 'Noise Removal' Effect. The default setting usually is all you need.
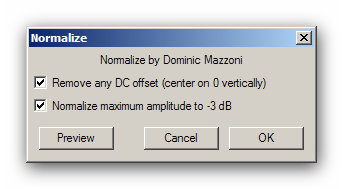 |
| Audacity's Normalize Effect. Default settings should do the trick. |
Normalizing will help all your audio sound like it was recorded at the same level. Incidentally these two effects are good to apply to any voice work you do where your microphone isn't of the best quality.
Once you've applied these effects, save out the files, with a different file name (never save over your source files). Now you can start chopping up your improved files into manageable chunks to upload to GoAnimate.
Creating the Show
How you put the show together is entirely up to you. If your guests have their own avatars available you may like to use them. If they normally use a character they've created in one of GoAnimate's character creators you may, if you have the funds, like to recreate that character.
However you represent your guests, be respectful as they've given up some of their time to make your show possible.

- Medium Close Up of the Interviewer - use this shot to focus attention of the question being asked.
- Two Shot - This shows both the Interviewer and Interviewee. Can be used whilst the interviewer is asking a question and/or to show the Interviewee reacting to the question as it is being asked. Can also be used to show the interviewer reacting to an answer as it is being given.
- Medium Close Up of the Interviewee - use this to focus on the Interviewee as they give their answer.
The Finished Interview
Below I've created an example animation which is by no means the pinnacle of interview animations but it does incorporate much of what I've mentioned above. I have used Text To Speech (TTS) voices and would recommend you choose the clearest voices if you're going to use them too.
Super Charge Interview by etourist on GoAnimate
Animation Software - Powered by GoAnimate.
Things to notice in the above animation...
- The interviewer demonstrates he has researched his guest by asking questions that include information about the guest's background and work.
- The interviewer's questions are specific and focus on details about his guest.
- Use of slides to enhance questions and to add visual variety.
- The interview is kept visually interesting by mixing up camera shots. It never holds one camera shot for too long. As a result the two and a half minutes fly by.
Conclusion
Hopefully you've stuck with this rather lengthy article and picked up a few tips on how you could improve your own animated interviews.
Once you do the research and decide what questions to ask, a GoAnimate Interview show is relatively easy to put together. The one I created above I put together in only a few hours (made easier when you're interviewing a character from your own animation - feel free to try it with your own characters).
By not sticking to generic questions that everyone asks and taking some time to make your show visually interesting will make your Interview Show stand out from the rest.
This is a great piece, E.
ReplyDeleteI printed this and read it earlier today, so I could comment.I had actually thought of doing an interview or two a few weeks back, but I have so much on the back log. So I put the idea off. I definitely liked your idea of asking more specific questions. I've only been the guest one one interview show, and I got the same old same old questions. If I ever do one or if I get another request for an interview I will refer them to this article.
ReplyDeleteWhen someone on GoAnimate says they've done an interview show I nearly always watch because I'm a 'behind the scenes' kind of person. I like to know how things are made, what inspired them etc.
DeleteI can forgive an interview animation for not varying camera shots if the interview questions and answers are good but too often people are asking that similar list of generic questions.
With the worst generic question being 'Which animation do you like best of mine?'
I kind of hope people read this and at least take on board the idea of asking more specific questions.
I hope so as well. I too have grown weary of the same old same old questions. When I was interviewed they cut out questions and my responses.
ReplyDeleteWhile having multi-interviewees is fine as in areal talk show, I'd rather get to know one specific animator.
Anyway, I can't recall if I have watched your interview or not. If I did it was when I first joined. I'll swing by later and check it out. There better be lots of camera angles. ;)
I created an animation with six scenes. it runs for 25 sec in total. How to ?increase the duration of each scene. any idea
ReplyDeleteIn GoAnimate, select the scene you wish to make longer and click the 'Scene Settings' button. This will bring up a properties palette of everything related to the scene including the scene length.
DeleteAlternatively you can just click on the scene and from the menu that appears select 'duration' and change the length to one of the numbers there.
Or you could even click and drag the right edge of the scene in the timeline and manually adjust the length of the scene that way.
Just came by to get the link for this to send to Shishiden Studio who has done a few interviews and will be doing more. You might want to check some out. She takes an interesting approach to an interview in this one when she interviews Denom:
ReplyDeletehttp://goanimate.com/videos/0bDOzz-0HI6E
Finally watched the Supercharge video as well.
I made an interview with you it self by reading this articles. I think you are going to help everyone like this .Good Luck!!
ReplyDeleteThis is an astounding post I seen because of offer it. It is truly what I needed to see trust in future you will proceed in sharing such a great post.
ReplyDelete