
|
| Wonder Unit Storyboarder. |
As an independent and solo animator I'm always tempted to try and skip storyboarding my animated shorts because they're usually only single scene sketch comedy type jokes. As a result I have many unfinished projects that kind of petered out due to having no clear finishing line.
Storyboarding your productions, no matter how small, gives you a step by step guide of every shot that needs to be completed (no planning shots as you animate). It also allows you to create an animatic that gives you a rough preview of the finished production. In short, you shouldn't skip storyboards as they, generally, increase the chance of the project being completed.
Disclaimer - I'm Not a Fan of Storyboarder
Upfront, Wonder Unit's Storyboarder is not my preferred storyboarding software. However it's completely free, has a number of very compelling features you wouldn't expect in a free product, and it really has no other competition in the free desktop app space. (FYI: I prefer Springboard which is low cost, one time license fee, but is looking very dated these days and is only available for Windows).
Storyboarder's documentation is awful and out of date, with many features not covered. While you can work a lot of it out from their Getting Started Guide (which is also the FAQs page) and the in app pop up tool tips, you will also benefit from reading the Storyboarder Home page, and visiting the dedicated development GIT hub wiki (if you want to know more about how layers work, as well as how to use the use the Shot Generator and VR storyboarding interface),
Storyboarder is less intuitive if you're not using it with a pen display monitor or drawing tablet, and is also terrible to use on smaller screens (yes I know you can scale up the User Interface but it was still difficult to use on my 14" laptop with a touch screen). Looks and works great on my 21" Pen display monitor though.
Starting a New Storyboard Document
There are two ways, the obvious, starting a new blank storyboard. Just pick a screen aspect ratio (16:9 in most cases) and you're away.
The second way allows you to import your script. If you want to try this, and you've been using KIT Scenarist, which I reviewed in my previous post, make sure you have scene numbers turned on in Scenarist's Export settings, and export as a Final Draft (FDX) file. I've tried exporting as a Fountain file and, for some reason, scene numbers don't get added to the document. Which are necessary for importing to Storyboarder to work.

|
| Storyboarder Opening Splash Screen. |
Storyboarding on Paper
If you prefer storyboarding on actual paper using an actual pencil or pen, Storyboarder has a template you can print out, draw on, then scan back in with your phone. Start a new, blank storyboard, print, draw, then scan your finished template. The panels will be arranged inside Storyboarder as separate frames that you can then add all the additional written detail to the descriptions.
Storyboarding My Mia and the Tourist Script

|
|
Mia and the Tourist Oppa Doll Style Characters. |
Since I'm trying to give you a behind the scenes of how I made my latest animated short of Mia and the Tourist I tried importing my script I wrote in my review of Scenarist. If you use this method Storyboarder will import all your scenes as separate storyboards, rather than one continuous storyboard, each with their own timeline.
Because I used an unconventional layout for my script, where I made each new shot a new scene (I don't know why, I think my rationale was it was a short script and the scene headings helped me visualize swapping between exterior and interior shots) it literally took me several days of tinkering with Storyboarder to understand that each scene was given its own timeline. There's literally no documentation on importing scripts into Storyboarder that I could find to explain this. I didn't know you could have multiple storyboards in the one project file.
Once your script is imported you'll see two scrollable columns down the left hand side of the app. The first is color coded with your scene heading information. The second has all the text from the currently selected scene split into its various action and dialogue statements. Double clicking on the various text segments will add them to the appropriate scene boxes of the currently selected board. Note that, if you already have added dialogue to a board, double clicking another line of dialogue will replace that line. You can't have two characters speaking on the same board panel.

|
|
This is how Storyboarder imports your script, breaking it into scenes and separate storyboards. |
I went through my whole imported script, creating new board panels for every section and using the suggested timing (based on the amount of dialogue) each board would display. Then I started drawing my shots.
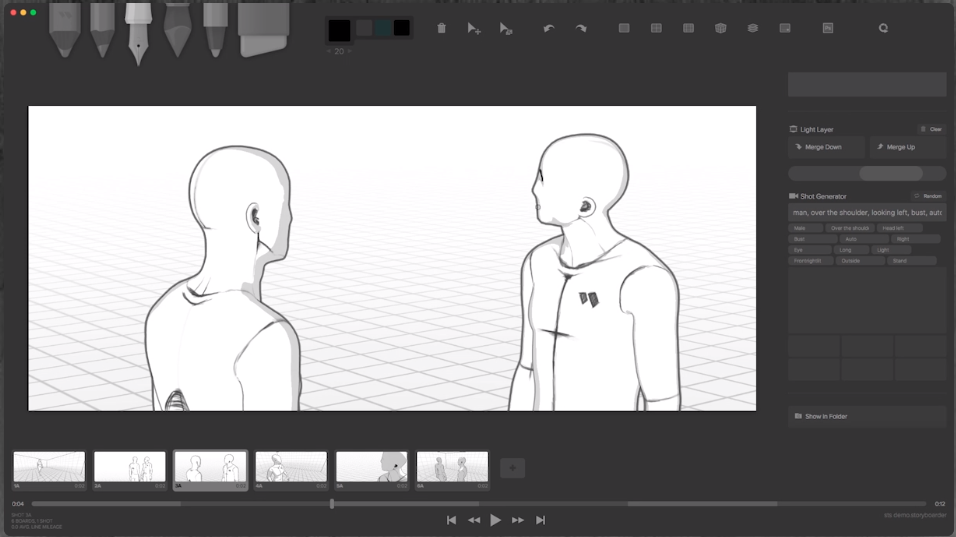
The Shot Generator
While you can use the Storyboarder's Shot Generator to 'draw' your entire storyboard, it's original purpose is to provide quick reference images that you can trace with your own character and scene drawings.
To use it you simply click the shot generator window, where you're presented with a 3D grid plane that you can start adding poseable characters and other 3D objects, to make up your scene. You can even import your own custom objects and images. Once you have everything in position, choose your camera angle then save out the final image to the reference layer of the current board.

|
| Wonder Unit Storyboarder Shot Generator. |
As you can see from the image above I managed to mock up an opening scene for my storyboard with my exterior shot of the rental car lot, including a 2D image of R2-D2 placed in the 3D scene. I have a large block representing the Office/Reception building.
In the next scene I've set up some poseable character avatars representing (from left to right) the rental car manager, Mia, and The Tourist standing inside the office/reception desk area.
If I wanted to I could use these scenes as is or use the drawing tools to trace over them with my own character images etc. then hide or remove the generated reference images. Note: I came across a possible bug where there was no way I could turn off or delete my reference images created with shot generator. Even if they weren't showing inside storyboarder they'd still appear in my exported documents. The only way I could fix it was to re-edit my generated shots so that the camera was looking at white space inside shot generator and saving this to the current board.
To be honest, I wanted to like the shot generator but I found myself getting too bogged down in unnecessary detail. Trying to find the right objects, the right character models, the right poses, the right placement etc. All of this you can even set up using a Virtual Reality headset (such as Oculus), which, by that point, I feel is defeating the purpose of storyboarding.
Storyboards are a working document. They're not meant to look pretty. They just have to be understandable by whoever needs to read them. The only time they need to look pretty is if they're part of a pitch to potential investors in your project.
Despite my reservations the shot generator is quite an amazing addition to a free app. I'm sure you could generate each board really quickly once you get used to it, but for me, quick thumbnail drawings are a much quicker way to go. Especially if the storyboard is just for my own use. I storyboarded my whole script with sketches drawn on my pen display monitor in less than an hour or so.
How I actually Storyboard
My storyboards are a two step process. I'll plan every scene out with rough as guts thumbnail drawings and maybe even make an animatic if I have my audio ready, or feel like recording placeholder audio. (If you're not familiar with what an animatic is, it's basically a slide show of your storyboard timed to match the dialogue and other audio from the animation. It gives you a rough idea of what the finished scene will look like).
I'll then go into my animation studio, in this case Cartoon Animator, and start recreating each image in my storyboard with the actual characters and backgrounds I intend to use in the final animation. I'll then record my audio and use it to put together an animatic of my storyboard. You'll see me do this in a future article of this series.
Running Storyboarder on my 21 inch pen display monitor, is the ideal way to use the app for sketching rough thumbnails. Each of the drawing tools represent a different layer of your image, hover over each tool to get a pop up call out box describing each. Only the eraser can affect all layers.

|
| One of my sketches for my Mia and the Tourist Storyboard. |
Since I already know what my characters will look like I tend to draw very rough likenesses in my storyboards. If I didn't have character designs as yet I would draw more generic forms, probably one step above actual stick figures.
In terms of Storyboarder's drawing tools, they're fine. I used the pencil tool to sketch my entire storyboard. Wherever possible I copied and pasted boards that had the same camera shot, erasing and redrawing just the parts of the scene that needed to be changed. There's enough drawing tools to make more refined and prettier boards if needed but most times you'll probably only use one or two tools.
What I did find frustrating was that, although you could lasso select part of a scene to move it around, you can't scale a lassoed selection. You can scale the whole scene, just not a part of the scene you've selected. For me that's a big oversight as I like to cut, paste, and scale things I've already drawn quite a bit to save time.
If you don't want to draw inside Storyboarder you can link the app to your preferred .PSD file supporting drawing app like Photoshop (or in my case Krita) and do all your drawing there just by clicking the PSD button. Again, for me, this defeats the purpose of a storyboarding app. Good to have an external graphics editor if you want to make pretty boards but quicker to just draw directly inside the app with its own drawing tools.
As you're drawing you can use the storyboard player buttons to switch between board panels and individual storyboards for each scene.
You can also play back your storyboards with captions turned on if you want to see the dialogue for each scene overlaid at the bottom of each frame.
Unfortunately there's no setting that will play back the storyboard for your entire script. You can only playback individual scenes. You have to manually switch to the next scene to play that scene's storyboard (which was quite annoying in my case since I wrote my script in an unconventional layout using scenes instead of camera shots).
Adding Audio
Storyboarder will allow you to add a single audio file to a scene either by recording directly into the board with a microphone or uploading an audio file. If the audio goes for longer than the current frame it will overlap into the next frame.
There's no way to edit audio once it's inside Storyboarder so it's best to record audio separately, get the timing and audio level right, and then import it.
At this stage I don't have any audio recorded for my project but I will add it in when I produce my finished animatic later in my process.
Export Options
While Storyboarder has a number of really useful export options, if you have a long script with lots of scenes, you cannot export everything in one go. You can only export the storyboard for one scene at a time (which, again, was a problem for me with my very short script written in my unconventional scene format).
If you want all your boards exported and ready to go, someone is going to be sitting there, manually sending off every scene for export.

|
|
A section of my storyboard exported as an animated GIF with captions. The grey background on some frames is some kind of bug where the reference layer is showing even though I cleared it and turned it off. |
That aside, you can export a scene as an animated GIF, or Video file complete with overlaid dialogue captions. There's options to export scenes as individual images or in a dedicated format for Final Cut Pro or Premiere video editors. You can also export your whole project as a zip file.
There's an option to export to the web but it appears you need a Storyboarder account with some kind of Storyboarder Community website that looked very much like a work in progress at the time of writing this review.
What matters most for me is being able to export to a PDF document, which you can with Storyboarder, with plenty of options for how the board is laid out (number of rows, columns etc.). If there was any export format where you should be able to export the entire project to, and not just the individual scene storyboards one at a time, it's the PDF export.
Unfortunately, even to PDF, you can only export one scene storyboard at a time.

|
| The same scene from above animated GIF exported as a PDF. |
---o ---o--- o---
For a free application Storyboarder is packed with features. If you're just storyboarding an individual scene, or not importing a lengthy script, it's definitely quick and intuitive (once you've learned where everything is).
I don't know who would use the VR features of the Shot Generator given you need a VR system to utilize it? Seems like overkill to me for a free storyboarding app but maybe great for pre-viz animatics?
Personally I think it's a better app without using the shot generator. Plus, if you really need reference images, it's possible to upload any image into the reference layer for you to trace.
If the ability to scale, cut, copy, and paste lasso selected regions of a drawing was added it would be enough in terms of having all the drawing tools needed to draw quick thumbnails.
Something not immediately obvious is that Storyboarder saves a lot of files per project and appears to have very poor storage/file management. There is an option in the file menu; 'Clean Up Scene...' which deletes unused files but, as near as I can tell, it's not that effective at deleting files if they weren't created in the current editing session... and who remembers to do something like that anyway? Should be automatic when you close the project.
As I said at the outset, Storyboarder is not my preferred storyboarding app. If you don't mind a US$39.95 one off payment for a less pretty but more capable storyboard app for Windows only, take a look at Springboard. It may look a little dated in it's user interface but it does pretty much everything you would want a drawing based storyboard app to do.
Otherwise, if you prefer something completely free that is still quite amazing, Storyboarder is the best storyboarding application out there.
Comments
Post a Comment
This blog is monitored by a real human. Generic or unrelated spam comments with links to sites of dubious relativity may be DELETED.
I welcome, read, and respond to genuine comments relating to each post. If your comment isn't that save me some time by not posting it.