
 |
| This background is made from a mix of props from six different content packs. |
One of Reallusion Cartoon Animator's selling points is that it can speed up your animation workflow with its time saving features. Among those features is the software's Content Library, a collection of premade, characters, props, scenes, motion files, and more, that either came with the application or you've added with purchases from Reallusion's Content Store or Marketplace.
If you've been following along, I've been reviewing applications I'm using in the process of creating my latest animated short featuring my original characters, Mia and the Tourist (and their replica, sentient, R2-D2 droid). Previously I wrote the script with KIT Scenarist, and drafted a storyboard using Wonder Unit's Storyboarder.
In this post I'll show you how I designed my backgrounds for my animation using my extensive Content Library collection. I'll give you tips for making your own scenes from existing content. At the end I'll give you a list of all the content packs I used and links to where you can find them in Reallusion's Content Store or Marketplace.
Two Approaches to Scene Design (Well Okay, Three...)
It's completely possible to draw all your background scenes from scratch in any graphics application that supports .PSD files. There's nothing wrong with this. Great if you can. However, to save time, it can be far quicker to use existing, premade scenes, or 'kit bash' a scene together using bits and pieces of existing premade scenes and props from Cartoon Animator's Content Library.
Using Existing Premade Scenes 'As Is'
Obviously this is the fastest method that works best if you know what scenes you have in your library, and storyboard with those scenes in mind. This is why it's extremely advantageous to become very familiar with your Content Library. Know your scenes, and just pull them straight onto the Cartoon Animator stage as needed... done!
'Kit Bashing' Scenes Together
At some point you're not going to be able to just purchase an 'off the shelf' scene. This is where 'kit bashing', the practice of piecing a background scene together from bits of existing scenes and other props you have in your Content Library, comes in. Knowing your Content Library will speed up the process.
Kit bashing is what I'm doing for my latest animation featuring Mia and the Tourist, which requires at least two different background scenes.
Creating My Background Scenes
Although my storyboard contains three actual backgrounds, two different exterior shots of the Rental Car lot and one interior of the sales office, it's important to note I'm not married to recreating the exact views in my storyboard.
Whatever content I find in my library will largely dictate how my backgrounds look and whether I can achieve the exact camera angles I planned, or if I need to compromise.
Scene 1: Exterior - Rental Car Lot - Daytime - Establishing Wide Shot.
 |
| Opening storyboard scene: Exterior, extreme wide shot of the Rental Car lot withR2-D2 browsing. |
When I write a script I never think about what I have in my Content Library so I end up kit bashing nearly all my background scenes. Case in point, this establishing wide shot of the car rental lot. In my storyboard it's a bird's eye view of the lot, which is not a typical angle for most premade scenes in Cartoon Animator.
The scene will be used for about 2-3 seconds at the start of the animation to establish that R2-D2 is looking around the lot on his own. It's going to be the hardest scene to create and how it comes together will help inform the look and style of my other two scenes.
Remember when you're loading a complete scene onto the Cartoon Animator Stage, to cherry pick items for your scene, only one scene can be on the stage at any one time. So make sure anything you want to keep on the stage is converted to a prop (with 'convert to prop' under the file menu or by right clicking on the item and selecting this option from the menu) and is not listed as part of a scene. Anything that is part of a scene will be deleted and replaced with the new scene. When you've finished your scene, if you want to save it as a scene (and not a project) You'll need to select everything that is a prop on the stage, go into the file menu, and select 'convert to scene'.
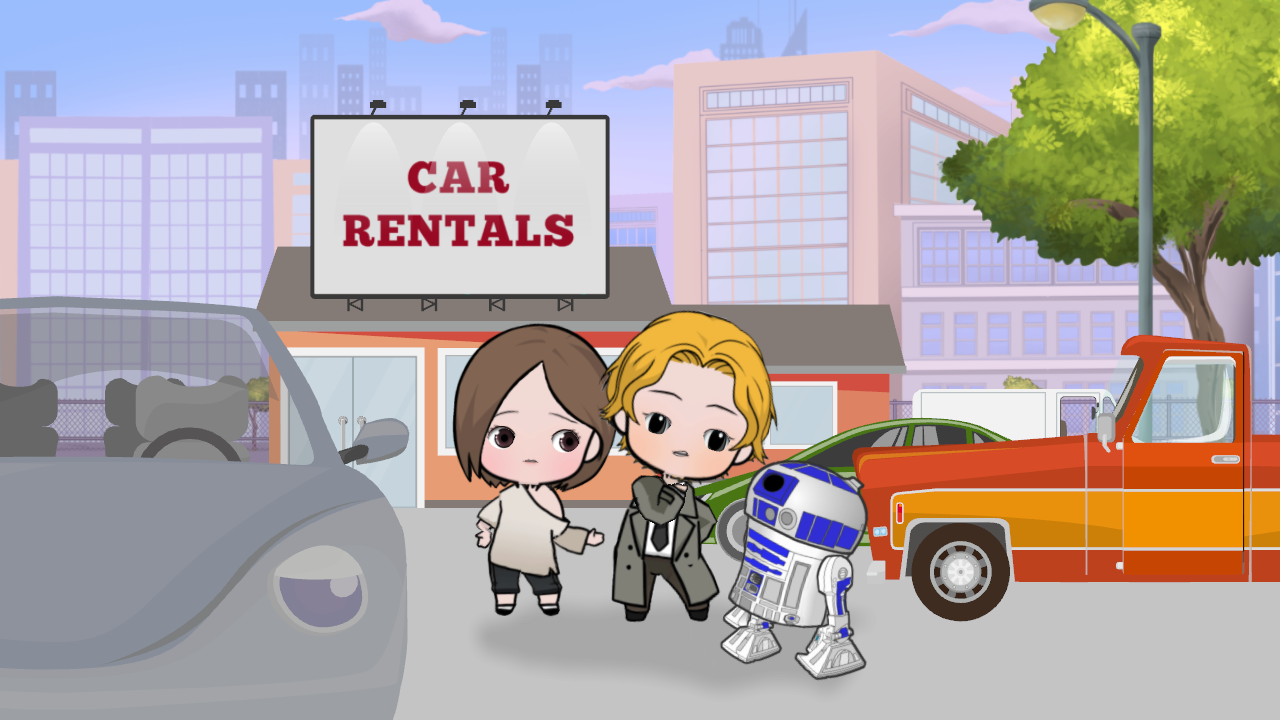
[Cut to a week or two later] After really looking through my Content Library I decided to drop the birds eye angle in favor of a ground level view (shown below) that I could show in a wide enough establishing shot for the same purpose.
 |
| The Exterior Car Rental Lot Background. |
I've also added a purple filter (i.e. purple rectangle with the opacity set to 50%) over the city scape to tone down and unify the colors so they don't draw your attention away from what what's going on in the more colorful Car Rental lot.
Scene 2: Interior - Rental Car Office/Reception - Daytime.
 |
| Second storyboard scene: Interior, wide shot of the Rental Car office with the Manager, Mia and the Tourist. |
This is the main location of my animation where most of the dialogue takes place. It introduces the rest of the cast, visually, and needs to convey that there are windows that look out into the lot because one character (the Tourist) is keeping an eye on R2-D2 as the other two characters are having a conversation.
Designing this scene was much easier than the exterior because my Content Library is filled with scenes of various rooms from this angle. That said, it still wasn't simply a case of just picking one.
The scene is still a kit bash background. The trickiest part was recreating what can be seen outside the one window in shot, to match the exterior of the building in the previous background.
Below is the full scene. In the animation the camera frame will be pretty tight on front desk area but wide enough so you can see about a third of the window on the right in shot.
 |
| Car Rental Sales Office Interior. |
Most of the content used is straight forward as is except for a little bit of stretching (e.g. the reception desk to make it longer) and I used Cartoon Animator's Render Styles feature to get everything in matching shades of blue.
On the right of the above image you can see I used the same base exterior building prop I used for the exterior in the previous scene to make the visible section you can see from the window. This required some heavy distortion of the prop to make it work.
 |
| This image demonstrates how the wide shot of the finished scene will be cropped. |
Scene 3: Exterior/Interior - Rental Car lot/Office - Daytime.
 |
| Third storyboard scene: Interior/exterior, wide shot of the Rental Car office interior and R2-D2 in the foreground. |
This scene is an eye level view of the lot, as if you were looking across from the fence line toward the main office. Both R2-D2 and the cast inside the office need to be in frame as you will hear dialogue from the office that refers to R2-D2 and his needs in a rental car.
[Again cut to a week or two later] One of the reasons I changed my opening scene to a ground level view was so I could reuse the scene again for this shot. It's easily created by cutting into a section of the first exterior scene as shown below.
All I've added to the scene is some masking shapes to hide my characters feet and legs, so it looks like they are inside the office.
 |
| Interior/Exterior shot achieved just by moving into the first scene and adding some masking to hide the legs of the characters inside. |
---o ---o--- o---
Hopefully you've found my run through of how I created my scene backgrounds useful. To finish up I'll leave you with a list of my best tips for kit bashing your own background scenes followed by my content sources if you're interested in purchasing any of these packs.
Kit Bashing Tips
- Try not to mix too many art styles. If you can, pick props and scenes from artists that have similar styles.
- Decide on whether your scene will feature art with (usually black) cartoon outlines or no outlines as a mixture will look amateurish unless....
- If you do mix outline and no outline props and characters it's important to do it in a consistent way. For example, divide your Z plane axis (distance of the camera from the scene in 3D space) into near and far away. Anything far away doesn't have and outline. Anything near does have an outline. The opposite of this probably wouldn't work as showing an outline implies you're seeing more detail. Objects further away from the camera typically show less detail.
- Generally if you are using outlined props in your scene then characters need to have outlines too because they will be 'near' the camera. If you aren't using any outlined props in your background then you can use either outlined characters or non outline characters but don't use a mix. Characters need to have the same or similar art style.
- Try to unify the color scheme of your background to a limited palette. Too many colors will distract from the characters in your scene. You can do this inside Cartoon Animator either by using the Render Style tool, or by applying a color shape filter (as I did in my first scene on the cityscape) with the opacity set to however strong you want the color to be (50% is a good starting point then adjust as needed).
List of Content Sources (Content Store and Marketplace)
- Kelharper: Main Street - Sky, city skyline, trees, street light.
- Buddy Plaza Scenes and Props: Community - Office Building Exterior.
- G3 Scenes and Props Assembly Kits: Street Buildup Systems - Exterior Office doors, windows, base ground (concrete walkway), billboard, van.
- Scenes and Props: Metro City Life: Street Scene - Green Car.
- Modern Vehicles Vol 2 - Pickup truck, Convertible (front).
- Cartoon Solutions Combo Vol 5: School Building - Fence.
- Cartoon Solutions Combo Vol 4: Clothing Store - Walls, ceiling, ceiling lights, floor, rear door.
- G3 Scenes and Props Assembly Kits: Street Buildup Systems - Windows, reception desk.
- Frank's Pencil: Open Space Office - Plant (big), frame, monitor.
- Buddy Plaza Scenes and Props: Community - Office Building Exterior.
Comments
Post a Comment
This blog is monitored by a real human. Generic or unrelated spam comments with links to sites of dubious relativity may be DELETED.
I welcome, read, and respond to genuine comments relating to each post. If your comment isn't that save me some time by not posting it.