
My Character Design Process for Puppet, Bone Rig 2D Animation in Reallusion's Cartoon Animator (Part 1) - Initial Design

Character design of a woman wearing a bikini overlaid on the character's initial sketch design.

Designing original characters for Reallusion's Cartoon Animator is a relatively easy process because, for the most part, you only really need one final, front facing image of your character design in a T-pose.

Using that pose as a base, you can build out a turn-able head (with perhaps a few additional sprites depending upon your needs), and a three quarter facing body, which is enough to allow the character to walk across the stage without looking weird.

In what will be a series of posts, I thought you may find it interesting to go behind the scenes as I design and rig a character for Cartoon Animator from the very beginning stage to a fully rigged G3-SVG character.


Choosing a Design

The character I'm creating is a bikini clad, blonde haired, woman, not just for the sake of drawing a scantily clad woman. Cartoon Animator's new Color Management tools allows you to create clothing systems for your characters where items can be added or removed just by changing color opacity.

The original bikini woman and her beach beau sketch from my sketch book.
The original page from my sketchbook.
I scanned the image in greyscale so
imagine this drawn in blue biro.

My plan is to give the character various outfit choices from a simple bikini to full business attire through color management.

These days I only draw new designs for characters if I have a project that requires something specific (such as my George and the Dragon Animated short). Otherwise I'll just page through my sketchbooks where I have hundreds of 'spontaneous' characters that I draw really quickly just for practice. It seems a waste to draw them and never use them for anything.

The original sketch of my bikini woman I drew on the 15th of January 2020. It was a Wednesday morning and I was on a run of sketching something, using biro, for about ten minutes, every day. Some days I'd sketch a little longer. This character sketch and her beach going partner takes up a full A4 sized page and was drawn in 18 minutes.

At a glance the image looks fine but if you really study it, you'll see it has a lot of anatomical issues - most glaringly to me at least, a super long left arm!


Frankenstein-ing a T-pose

Given my sketch only took 18 minutes I could probably have just redrawn the character in a T-pose in about that time but why waste another sheet of paper?

Bikini woman in her 'Frankenstein-ed' T-pose sketch.
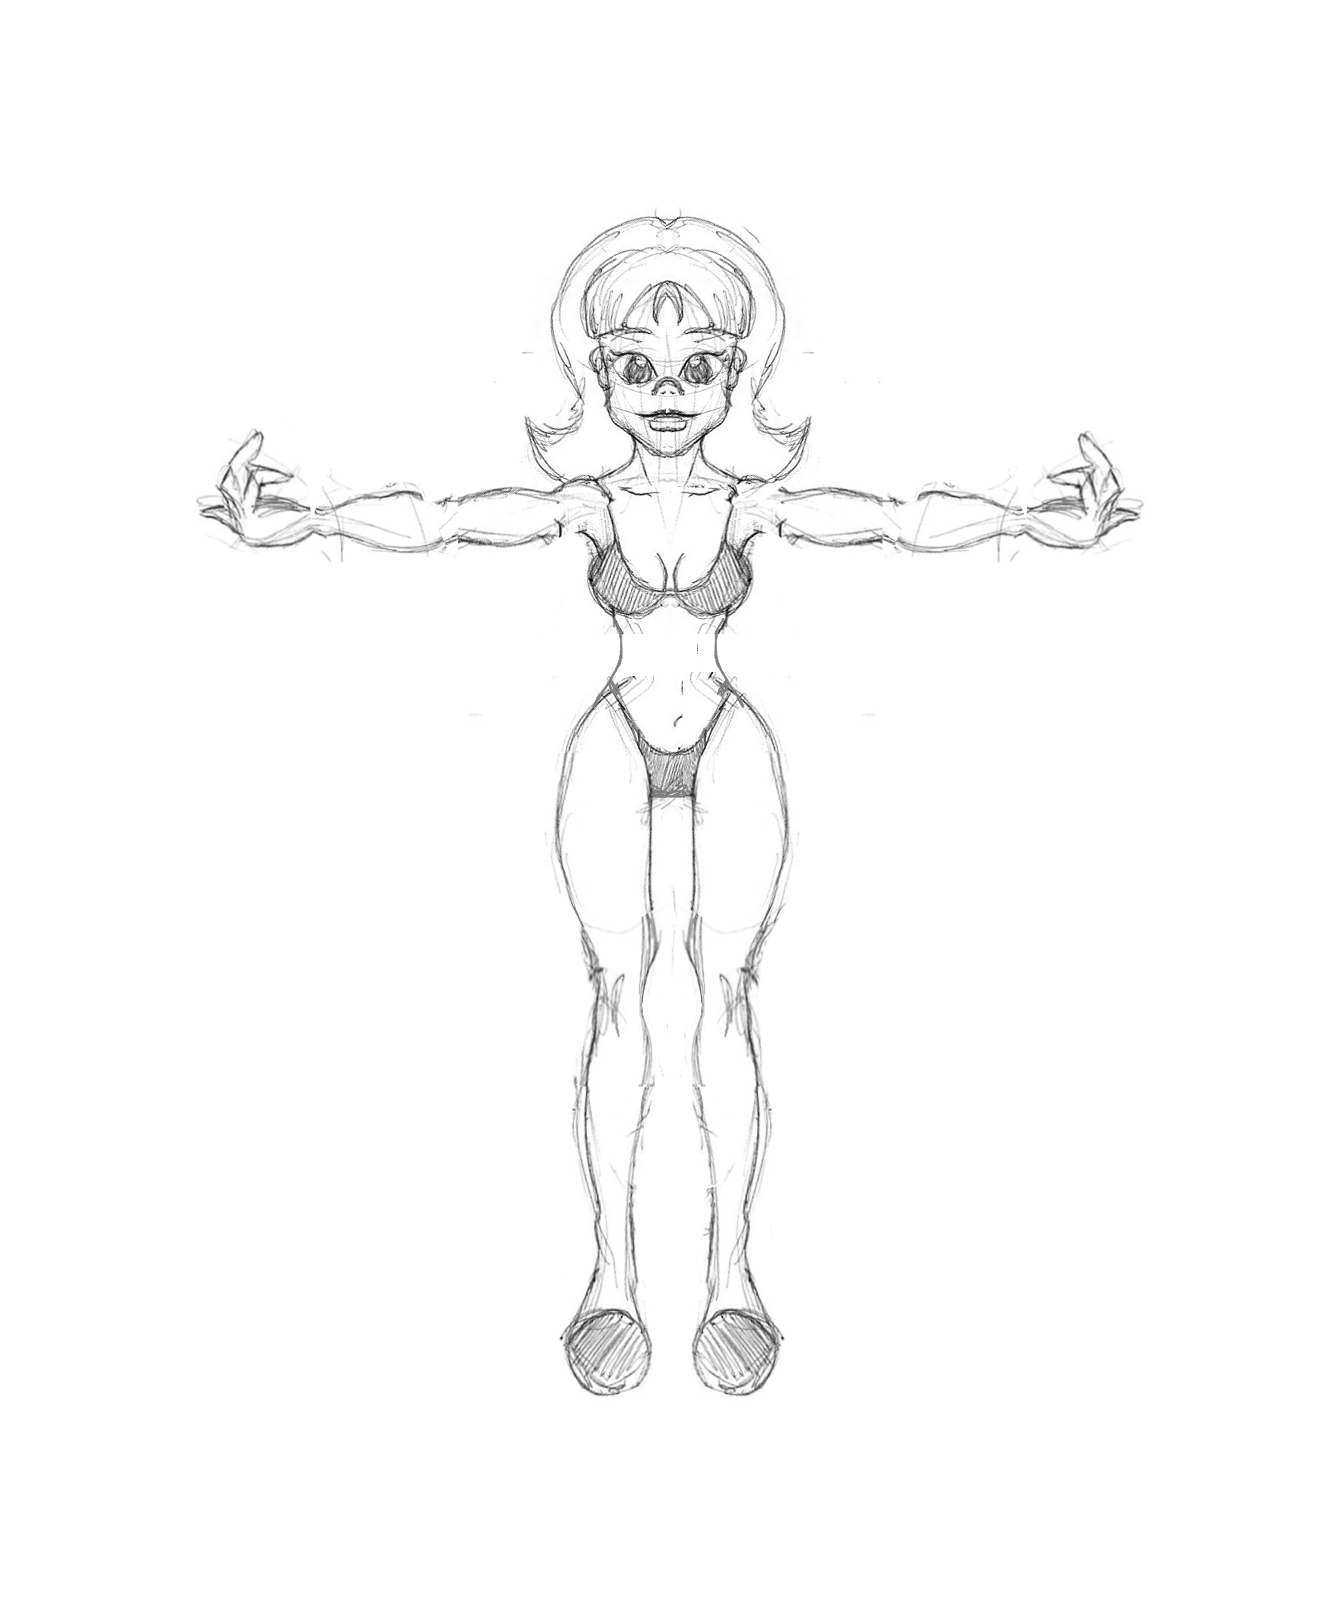
The 'Frankestein-ed' T-Pose. It looks a bit like
she's giving a double 'bird' flip but it's the
wrong finger!

I scanned the image into Krita (my graphics editor) and used the selection tools, plus the distort and skew tools, along with cut and paste to rearrange the limbs on the right side (the character's right, our left) of her body into half of a T-pose.

Once I was happy with that I mirrored the entire right side of the character (including her head and face) to the left side, creating a perfectly symmetrical, front facing character in a T-pose. 

While I'm aware most humans aren't perfectly symmetrical they're usually close enough to pass for it unless you really study their appearance. Most importantly though, this method saves time.

You'll notice from the image I didn't worry about getting her hands and fingers into a flattened pose. Since the sketch is going to be traced I figured the hands would be easy enough to recreate in the correct pose without needing guidelines.


Inking and Coloring the Character

Next I imported the sketch into the appropriately titled Inkscape (my vector graphics editor) to do the 'inking'... or in this case coloring since I haven't added outlines to the character (but I plan to at a later time).

As with my sketch in Krita I only traced and colored the right side of the character (I'll mirror this when it's done) with no consideration for breaking everything up into the individual sprites needed for a Cartoon Animator character template.

I draw this way because if I think about breaking everything up into the sprites, it really slows me down... a lot. I don't actually like drawing in vector software. A relatively simple, traced drawing like this character took the best part of a day because I find it hard to stay focused.

The bikini woman character half colored down the right side of her body in InkScape.
It's a real time saver only coloring half of the character in Inkscape and then mirroring
this to the other side of the character. I only have to adjust the shading on the
mirrored side and I'm done.


That aside I know the results of how versatile a vector character can be are well worth pushing through, what is a bit of a slog, for me.

Next I'll go through and separate all the body sprites so that the various joints will work once they are rigged. The face is already separated because everything there is easy enough to group into the correct facial sprites naturally.

Once that's done I'll go through and create the additional eye and mouth sprites required to make a fully animated face. That'll be for part 2 of this article series.

For now, here's a final test detail image of the character showing how I've changed the coloring on the character's left side to be shadows instead of highlights.

Detail colored image of the bikini woman's head with the sides of the character mirrored and the shadow adjusted.
This is only a test image of the finished character. I'll probably add more shadows
and other details on the final version.


Popular posts from this blog

Can You Learn Reallusion's Cartoon Animator 5 for Free Using Their 137 Official YouTube Video Tutorials Sorted Into a Logical Learning Order?

Or you could just buy The Lazy Animator Beginner's Guide to Cartoon Animator . While Reallusion's Cartoon Animator is one of the easiest 2D animation studios to get up and running with quickly, learning it from all of the official, free, video tutorials can be more overwhelming than helpful. With more than 137 videos totaling more than 28 and a half hours of tutorials, spread across three generations of the software (Cartoon Animator 3 through 5) it's hard to know if what you're learning is a current or legacy feature that you either need to know or can be skipped. Many of the official tutorials only teach specific features of the software and don't relate at all to previous or later tutorials. As a result there are many features either not mentioned or are hard to find. To make your learning easier, on this page, I've collected together all of the essential, official, free video tutorials and sorted them into a learning order that makes sense. Simply start at

AE Juice - Animation Presets, Motion Graphics, Templates, Transitions for After Effects, Premiere Pro, and Other Video Applications

Level up you video edits and animations with AE Juice's motion graphics and templates. Some days you just don't have the time to create flashy motion graphics for your latest video or animation. For some of us it's more a question of our own artistic abilities being a little less than the awesome we'd like them to be. Whatever reason a resource like AE Juice's animation presets, motion graphics, templates, and transitions packs for After Effects , Premiere Pro , and other video applications can really make your work stand out very quickly. AE Juice gives you access to an instant library of free, premade content elements and sound effects, which you can add to with additional purchases of various themed packs from their store. There are three ways to manage their content, all of which can be used in commercial projects . The AE Juice Standalone Package Manager makes it easy to browse previews of all your pack contents and to download and find just the elements yo

Artbreeder - Using AI created Character and Background Content in your Animations

A selection of User/AI generated images from Artbreeder. If you're looking for an endless supply of 2D character and background images for your animations then Artbreeder , an online Artificial Intelligence (AI) that generates image mash-ups you can tweak as much as you like, could be the ultimate content library. What is Artbreeder? Artbreeder is free to use though there are various paid plans, that give you additional features, such as higher resolution download images or more settings to play with. All images created on the site are Public Domain (CC0 License) and can be used in commercial projects. Using Artbreeder's online app you can generate head shot portraits, full body characters, landscapes, and other scenes simply by choosing two or more existing images to mash together then, using a series of sliders, to select which traits from each image you wish to lean toward in the final image. Photo Comparison - Top is my original uploaded photo. Bottom is Artbreeder's ap

Jarrad Wright, The Big Lez Show - Who Would've thought Animating with MS Paint Could Take You So Far?

A friend of mine recommended I should check out The Big Lez Show after I mentioned to him I make animations for living. He said the show's creator, Australian animator, Jarrad Wright , just makes episodes from his home using MS Paint. Somewhat shamefully I hadn't heard of The Big Lez Show, but the fact that it was being made with MS Paint absolutely hooked me into checking out. If you've never heard or seen the show then you, like I was, are probably thinking how good could it be? MS Paint has kind of a cult following of hardcore animators but no one would use it as their primary animation tool on a series, right? WARNING - before going any further, you need to know The Big Lez Show and its humor contains some pretty strong language. By strong I mean it's peppered very liberally with the 'F' and 'C' words and is very every day Aussie, blue collar speak. Unapologetically, all of that, is part of why it's so good. There's a good chance you've

Moho 14 Released - Still the Best 2D Animation Software for Indy Animators on a Budget

Moho 14 Released. Regular readers know I am a Reallusion, Cartoon Animator advocate through and through. Hands down I would recommend Cartoon Animator 5 first over Lost Marble's Moho 14 to anyone who is just starting in 2D animation, is a team of one, or just needs to animate as quickly as possible. However, feature for feature, Moho is, arguably, the best 2D animation software for the rest of us who can't justify a Toon Boom Harmony , or Adobe Creative Cloud subscription (and even with their applications Moho is very competitive on features). You can get started with Moho Debut for just USD$59.99 which is a cut down version of Moho Pro but it still has the most essential features needed for 2D animation. While Moho Pro is a whopping USD$399.99 (Cartoon Animator, which only has one version, is just USD$149.00) upgrades to new version numbers come down to a quarter of the price at USD$99.00. Even though Reallusion just released features like Motion Pilot Puppet Animation and

Reallusion Releases Cartoon Animator 5 - One Version, More Features, Lower Price!

If you're serious about producing 2D animation as quickly as possible, while still achieving professional results, Reallusion's Cartoon Animator 5 makes the most compelling case yet as your animation studio/tool of choice. Cartoon Animator's point of difference has always been its ease of use and accelerated workflow. Creating fast, 2D animation using puppet, bone rigged based characters and props, on a stage with 3D depth for easy scene parallax effects. As it has developed Reallusion has incorporated more advanced features like motion capture for both face and body as well as being able to export scenes to post production tools like After Effects with the addition of plugins. After moving away from Flash based vector image support for a few years, Reallusion is back with full .SVG (scalable vector graphics) support for resolution independent graphics. They've also added Spring Dynamic physics and Full Form Deformation tools, both of which make it ridiculously easy t

Cartoon Animator 5 and G2 Characters - Why You'll Probably Never Use Them Even Though They're Great

Since I've previously covered how to get the most out of your purchased G3 and G1 characters for Reallusion's Cartoon Animator 5, it would be remiss of me not to look at the greatest character rig of all time, G2 characters. G2 Characters have been mostly relegated to legacy status since Cartoon Animator 3 but, as a rig that let you create fully 360 degree turn-able characters that moved in 3D space, animated with 3D motion files, and were mostly vector based, there was nothing else like them in any other 2D  software. The problem was, even with the templates provided by Reallusion for both Adobe Flash and Serif DrawPlus , they were complex and time consuming to make from scratch. They were also difficult to customize because there was no way to export and edit individual parts. G2 characters just weren't easy enough for the casual Cartoon Animator user to customize so they fell by the wayside. However they're still fully supported in CA5 with all the same functional