
Preparing for Rigging - My Character Design Process for Puppet, Bone Rig 2D Animation in Reallusion's Cartoon Animator (Part 2)

Composite image of my Bikini Girl Character in Inkscape half 'inked' and half showing the underlying, vector wireframe.

I'm not known for my super fast character design for Cartoon Animator. It's why I constantly look for short cuts in rigging characters because I get bored or distract... squirrel!

In this second post on rigging my first, complete G3-SVG vector character I'll run you through how I take my initial, 'inked' using Inkscape design, from part 1 of this series, and break it up into the key sprite body parts.

Marking the Joints

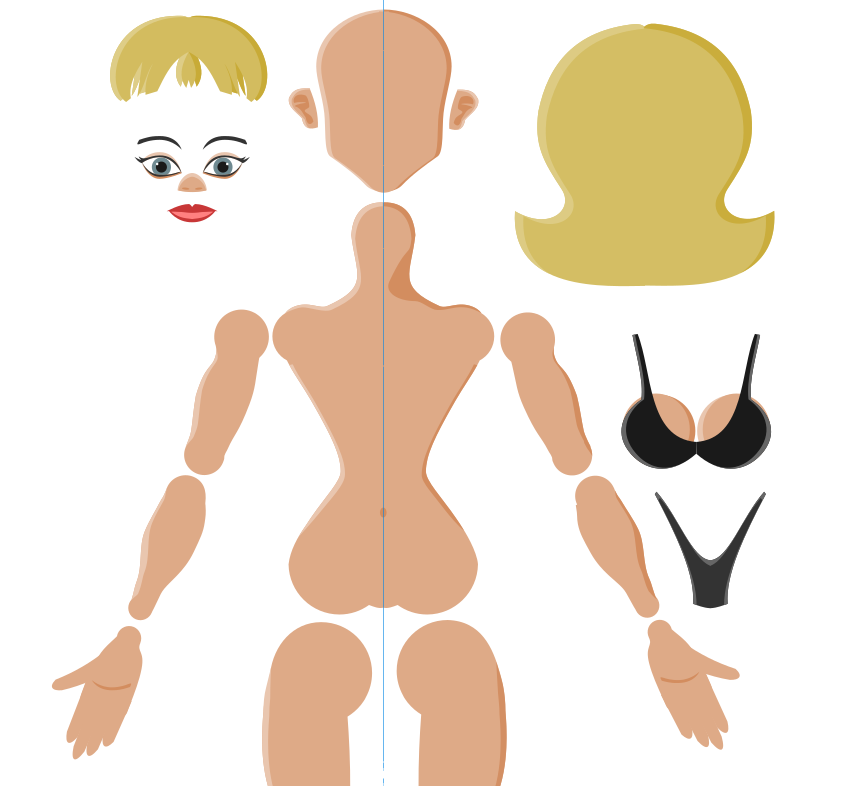
The main image for this post at the top of the article is a little deceptive as it shows a composite of my, mostly, complete character divided in half so you can see the underlying vector lines - totally for effect to create an interesting image.

Imagine this image is still just the half image I traced and colored from last time. The next step is to create a joint layer and mark where all my joints (i.e. bone points) will be with my semi-transparent circular crosshairs that you can see in the image. But only on one side, remember. All of this will be mirrored when complete.

Detail image of my characters arm showing the placement of my circular crosshair joint markers.
Detail image of my characters arm showing the placement
of my circular crosshair joint markers.

The purpose of these crosshairs is to mark the center point for the bone placement and then to create a circular region around the bone point that will create an almost seamless joint between each sprite.

The circular area, generally, should be as large as possible without going outside the boundary of the character's shape. Once the two sprites are pinned together the joint works like a hinge and should look fine in any natural pose of the character.

Note that I am designing this character to have bone hands but, as of writing this, each of the characters fingers are a full sprite. I've yet to separate them into the smaller joint segments.

Dividing Up the Body Into Sprites

If you recall I drew my character's body as one complete shape. My next step is to cut this up into sprites. It's a little tricky, and time consuming but I actually find this method easier than separating the character into sprites as I go.

Figure 1: Image sequence showing how I slice up my character's body shape into the various body part, sprite shapes.
Figure 1: Sequence showing how I
create my sprites joints.
It involves duplicating a line from my crosshairs that I use to cut the body sprite at the joint (see image 1 of Figure 1) using the 'Division' path function. Make sure you move the duplicate line to the same layer as the body shape if you're going to try this).

This slices the image in two where my crosshair line was (see image 2 of Figure 1). The crosshair line itself will vanish which is why I work with a duplicate.

Next I'll make a duplicate of the circle part of my crosshair, hide the section of the body I'm not working on just yet. In this case that's the upper leg (see image 3 of Figure 1).

I'll then color this circle with the same fill and line color of my body shape. I'll then make a duplicate of this circle that I'll use for the upper limb, once I've completed the lower limb (make sure the two circles are perfectly aligned).

Finally I'll combine my circle with the end of the body part I'm working on - in this case the right shank or lower right leg - by selecting the circle and the body part and executing a 'Union' path function on them (see image 4 of Figure 1).

This creates a perfectly round end to my sprite.

I'll then use the duplicate circle and combine that with the upper part of the same limb - in this case the right thigh - giving a perfectly round end to that sprite too.

Demonstration of how to create a joint when a character has outlines.
Figure 2 - Demonstration of how to create a
joint when a character has outlines that you
want to minimise the line break points.
I'll go around and do this for all my joints.

Note that if you're creating a character with outlines you can sometimes create the illusion of unbroken lines if you make one end of a sprite circular and the adjoining end flat but covering half of the circle (see Figure 2).

Adding Highlights and Shadows

Exploded, detail view of my character's sprites.
Detail view of most of my character's main sprites
with highlights and shadows added, and sprites
like the torso and face combined into one sprite.
Once I've divided up all my sprites I'll then go through and either add more highlights and shadows or fix any that I've already included so that they don't bleed over into my joint circle areas. 

Minimising shading or highlights around your joints will help prevent any unexpected lines when limbs start moving around. Although if you study figure 2 (in the previous section) and apply those principles for the outlines to shadows and highlights, it can work quite seamlessly.

Once these are done I'm ready to mirror the entire design so I have a complete character. This is simply a case of selecting all my character parts, duplicating and flipping them vertically.

After I've lined up the two halves of the character I'll join the two halves of the torso/hip sprite together with a Union path function. I'll do the same with the face, back hair, front hair, nose, and mouth.

Next Steps...

Although it looks like I'm close to rigging the character I still need to create all my eye and mouth sprite expressions. I'm hoping that won't take too long given how much easier it is to modify vectors into different shapes.

Hopefully in the next post I'll be able to put all my sprites into Reallusion's Front Facing Character template and complete a first test animation.

Popular posts from this blog

Eight 2D Animation Apps For Your Phone or Tablet Mobile Device

M obile productivity apps have become so capable that they can be great alternatives to their PC/MAC equivalents or serve as great tools in their own right when you're away from your desk. While some apps simply mimic their desktop counterparts, others offer well thought out, touch-friendly interfaces that are easier and more fun to use. Every so often I check out what's available for 2D animation for Android devices, since that's what I use, that can complement my workflow with Reallusion's Cartoon Animator 5. Some may be available for Apple devices as well. Below I've listed six free (F) apps (with optional paid (P) upgrades) on the Google Play Store that you might want to explore. Some are just fun apps on their own while others may be useful as part of your workflow on bigger animation projects. Not all are exclusively animation apps and could be used on any production. JotterPad (F/P) The name JotterPad makes this sound like a notepad application but it's ...

Inochi2D - Free Open Source 2D VTuber Avatar Rigging and Puppeteering Software (Part 1)

Inochi2D Creator - Free Open Source VTuber Software. If you've been looking for a way to live perform as a 2D cartoon avatar on camera, whether it be for a live stream or for pre-recorded content like educational videos, then VTuber software is a low cost (or even no cost) option worth looking into. In my previous post, How to Become a VTuber - 2D and 3D Software for Creating and Controlling Your Avatar , I took a brief look at the relatively new but completely free and open source Inochi2D  which I thought showed great potential for my own needs of creating a live performance character rig for my own TET Avatar that I use for all my promotional materials. While it is possible to live perform my character using Cartoon Animator itself, Reallusion's MotionLive2D capture system isn't great - with lip sync in particular. More importantly though, I can't exactly teach people how to use Cartoon Animator if I'm using Cartoon Animator to control my Avatar. What is Inochi2D...

OpenArt Versus Dzine: AI Consistent Character Training Compared

TET2d Avatar Image created with Dzine . R egular readers of Animation and Video Life will be familiar with my alter ego, 2D avatar character, TET, who is both the face of The Lazy Animator Cartoon Animator Tutorials, and is currently part of my Resident Dragon joke cartoon series. It is my goal to use him as an animated avatar for both my Lazy Animator video courses and my Cartoon Animator tutorials that you'll find on my @AnimLife YouTube channel . Unfortunately I don't have the time to animate him for every single project. Even with Cartoon Animator's time-saving workflow I wouldn't be able to produce animated content quick enough. Which is why advances in AI animation is something that is increasingly more interesting to me each day. Consistent Characters Before we get there I have to overcome one of the biggest hurdles in AI I've come across... reproducing my art style consistently. I don't want an approximation of my characters, I want my characters looki...

Create 2D Animated Characters with 3D Character Creator Tools and Artistic Filters

3D CC3 TET Character, based on my Oppa Doll Avatar, used as the base for a 2D CA4 character. One of my favorite things to do is to create characters with any type of Avatar/Character creator app. In fact the first test I usually try with these tools is, can I make an avatar of me (or at least my The Extraordinary Tourist persona). Previously I've used 2D character creators like Oppa Doll as a source of artwork for some characters I've made for Reallusion's Cartoon Animator 4 animation studio but 2D character creators are limited to... well 2D. 3D Character Creators While you may think 3D character creators have no place in creating characters for 2D animation there are quite a number of advantages including: No drawing skills required. Render characters in any style. Use an art filter or even hand trace into line art. Need to animate the character in a specific pose or angle? Render out an image of the character in the required angle and animate it in 2D. Quicker to crea...

Creating an AI Digital Avatar and Voice Clone of Myself with Free and Low Cost AI Tools

O ver the years I've looked at various ways of creating and animating a digital avatar, from simply creating a character for Cartoon Animator and voicing and animating it myself, to creating a  live motion capture ready Vtuber avatar puppeted and voiced by me in real-time. In the last year or so, making photographic images talk, using AI and AI voice cloning has really progressed. To the point where I wondered if I could create a photographic AI avatar of myself, complete with my cloned voice, that I might use on some of my videos? Creating My Avatar: Artflow To create my avatar image, as far as I'm concerned,  Artflow.ai is the best value AI site for creating consistent digital characters (or 'actors' as Artflow calls them). That's pretty much their entire focus. Artflow's actor model training user interface. You get your first actor for free, 100 free credits per month (which equates to 100 still images per month - get an additional 50 credits if you sign...

Artbreeder - Using AI created Character and Background Content in your Animations

A selection of User/AI generated images from Artbreeder. If you're looking for an endless supply of 2D character and background images for your animations then Artbreeder , an online Artificial Intelligence (AI) that generates image mash-ups you can tweak as much as you like, could be the ultimate content library. What is Artbreeder? Artbreeder is free to use though there are various paid plans, that give you additional features, such as higher resolution download images or more settings to play with. All images created on the site are Public Domain (CC0 License) and can be used in commercial projects. Using Artbreeder's online app you can generate head shot portraits, full body characters, landscapes, and other scenes simply by choosing two or more existing images to mash together then, using a series of sliders, to select which traits from each image you wish to lean toward in the final image. Photo Comparison - Top is my original uploaded photo. Bottom is Artbreeder's ap...

Can a Solo Animator Make an Animated Feature Film or TV Series?

Series Creation Tip: If this is your first attempt at a series start small with two to four main characters and two or three sets that you can reuse each episode. My new series in development, Resident Dragon has four characters and is set in a suburban home. Recently I was asked if a solo animator could make a feature film? The short answer is 'YES'. Logically, with enough time, you can achieve anything. The very next question I was asked is how long do I think it would take and could it be done within a year? My initial answer was, it depends on the skill of the creator, noting that a Disney feature film takes a minimum of (I'm only guesstimating here) three to five years, based on when a movie is announced to when it actually gets released, with thousands of people working on it. Which implies that a single person trying to do the same thing may take the best part of a lifetime to make just one animated feature film. However is this really the case? Let's be clear, ...