Fixing the Rig - My Character Design Process for Puppet, Bone Rig 2D Animation in Reallusion's Cartoon Animator (Part 4)
I wanted to start this installment of my series, where I document the process of creating my first ever, complete vector character for Cartoon Animator 5 using Inkscape, on a positive note. After much study and pouring over various templates I can confirm I'm not the issue. The Inkscape template is buggy, even the new ones... or maybe it's Inkscape itself?
The reason I say this is, when you're working with Reallusion's character templates, problems with creating these characters is nearly always down to human error. Quite often it's a simple spelling mistake on a folder that has to be a specific name, or you've deleted something you shouldn't have.
However I've been studying over these templates in extensive detail. Not just trying to solve my issues but also pulling them apart to try and discover a way to make this process easier - like I did with creating G3-PSD characters in my Fastest Way to Rig a Character in Cartoon Animator tutorials.
If you haven't already you may like to go back and read the first three articles in the series to follow along from the beginning. You can read part 1, part 2, and part 3 at these links. It's not essential unless you want to see how I designed my Business/Bikini Girl Character from the beginning sketch.
While one or two of the issues I was having with my character were on me, the bigger problems have been either template or Inkscape issues. I can't be sure which.
Let's Recap the Problems...
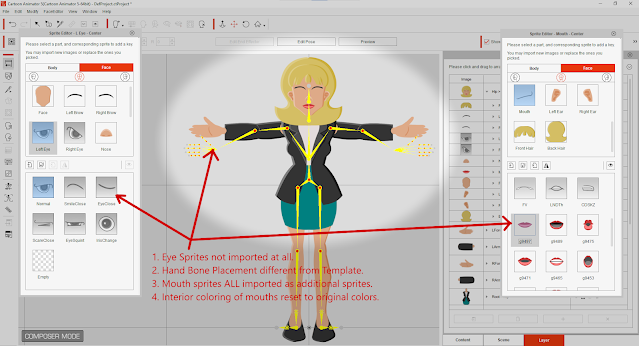
This is the list of the problems that presented themselves after importing my character template into Cartoon Animator for the first time:
- All of the eye sprites did not import and were missing.
- Two error report line items saying CA does not support SVG files with raster images.
- Both left and right hand bones extremely misaligned from where they should be.
- All mouth sprites imported as additional mouth images instead of into the required first 15 mouth sprite positions.
- Mouth interior of open mouths all in grey scale and not matching the color in the template.
- Layering issue with the character's shoulder where skin tone could be seen instead of the character's jacket sleeve.
Number six was also an easy fix to a problem of my own making. It just required me adding a circle mask over the skin tone area to match the jacket sleeve color.
Troubleshooting the Remaining Problems
I spent an entire weekend trying to resolve these without getting anywhere. On the off chance, I decided to check my Reallusion account to see if the vector template resources had been updated since I first downloaded them back in November of 2022. They had. In fact they included an additional side facing 01 template (for a character facing a full ninety degrees to the left or right).
Needless to say, switching over to the new template marked a turning point that suggests some of my issues may have been due to a faulty template.
With my fresh, official character template I transferred my character graphics across making sure that I didn't change a single group folder name - even ones with the word 'Replace' as part of the name.
Importing my updated character template resolved the issue of my eyes not importing at all but I now have a new issue in that I get errors if I don't include eye white masks in eye sprites that don't actually require an eye white mask sprite. Same goes for if I leave out the Iris when it's not needed.
The new template didn't quite resolve the issue of the hand bones being incorrectly aligned with the hand sprites as they are in the template. This time the left hand bones were aligned but the right hand bones, while more closely aligned, were still noticeably off where they should be. I could just fix this by moving the bones in Cartoon Animator's composer but doing so means I have to make that adjustment every time I reimport my template. Annoying.
My mouth sprites all loaded into their correct 15 standard mouth sprite positions but the issue of the mouth interiors being changed to black and white was still present (though at least the character's teeth were now white and not black). I don't know how to fix this?
On a positive note, the character imported mostly intact.
New Problems
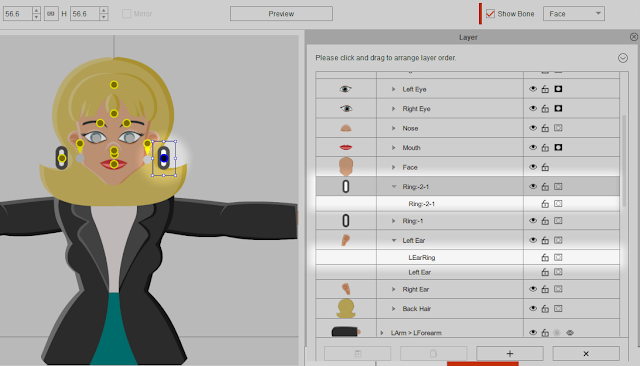
For some reason my template now imported with additional bones for earrings? My character doesn't have earrings so I turned these sprites off. Now I get bones where the earrings should be, and another set of bones positioned on the far top left of my template document - or at least that's where they would be if you lined up the imported character with how it appears in the template.
To fix this I turned the sprites back on and renamed the bones to match the sprite names. This positioned the bones back where they should be with the sprites but I still had two sets of earring bones?
The eye white and iris problem looks like the fix is to just create an eye white mask that masks out the iris completely on those eyes that don't need eye white or an iris. The official template has dummy masks and Iris in folders where you don't need either.
With the character mostly imported I was able to see it moving and discovered the skirt design wasn't working how I would like. When the character's thighs move beyond the boundary of the skirt edge it looks like the skirt is slit up the sides to a level that's just a bit too revealing for office wear.
I think I can fix this by adding some element of the skirt to the thigh sprites so it looks like the skirt stretches when the character moves her legs, rather than looking like it splits at the sides.
Troubleshooting Again... Photopea Fixes Everything (Almost)
I spent a ridiculous amount of time trying to solve this additional earing bone problem. The best I've achieved so far is getting them within the boundaries of the character rather than way up high in the top left of the document, making my character area bigger than it should be.
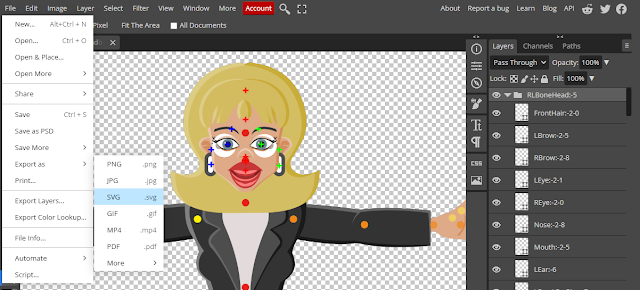
On the off chance that my new template was still buggy I thought, lets try opening my SVG file (the current iteration with all the new problems) in Photopea, the cloud based, free graphics editor also recommended by Reallusion for creating SVG characters.
To my surprise opening the file saved from Inkscape in Photopea revealed a whole bunch of folders renamed with system names, some folders still having old names, even though they'd been updated to new names in Inkscape.
I really don't know if it was Photopea not opening the file correctly, or Inkscape not saving the file correctly? Either way I went through and got rid of any of my working folders, and fixed any folder names that had been changed. Then I exported the document from Photopea as an SVG file.
 |
| Make sure you export your template from Photopea as an SVG file. |
Importing this version of the template into Cartoon Animator I discovered my hand bone misalignment was now fixed, and my mouth sprite interiors were no longer black and white, being colored in their correct tones. I did nothing to fix this other than open and then export the file in Photopea.
If I can just resolve the duplicate earing bones, and sort out the eye whites and irises in the folders where they are not actually needed, this whole rig will be ready to move onto the final step, rigging the G3-360 head in Cartoon Animator.
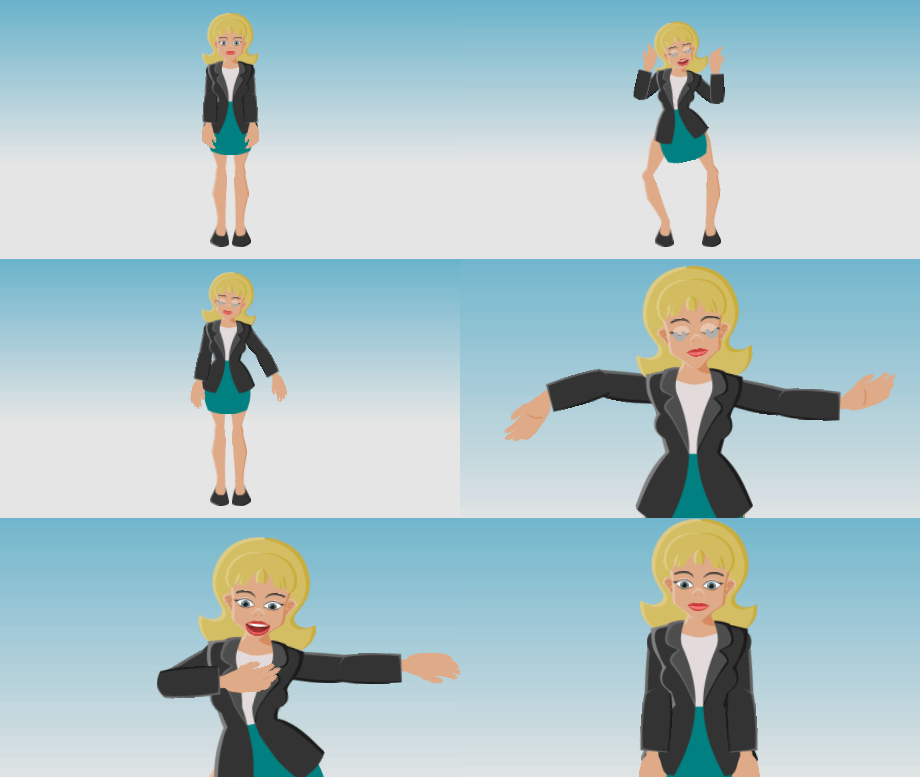
Anyhow, if you've read this far, you've definitely earned a look at this character in a short test animation. It still has some of the problems I've outlined above (and doesn't yet have a G3-360 head) but generally it's looking very promising.
So, Not Human Error
Virtually all the problems I encountered were solved by changing to either a different template file or even a different application. The human errors were in cosmetic fixes to the actual character design, like masking the shoulders, fixing the skirt, or sorting out the eye whites.
I'm still not sure why I have two sets of bones for the earrings but hopefully I'll sort that out. I could just delete the bones since my character doesn't have earrings but it would be nice to resolve the issue now. I feel it may be a naming issue but I'm not sure exactly how?
If you're attempting to create G3-SVG characters using Inkscape and run into any of these issues when you attempt to import the character into Cartoon Animator, I would strongly recommend opening your SVG template in Photopea, checking the template folder names to make sure they're correct, and then export the document out as an SVG file. It may just fix almost everything.
---o ---o--- o---
Initially I thought this would be the final part of this series but I think we need one more post just to resolve the remaining issues, and talk a little bit about setting up the character's G3-360 head. Hopefully I can put together a quick animation of the finished character for you by then too.


Comments
Post a Comment
This blog is monitored by a real human. Generic or unrelated spam comments with links to sites of dubious relativity may be DELETED.
I welcome, read, and respond to genuine comments relating to each post. If your comment isn't that save me some time by not posting it.