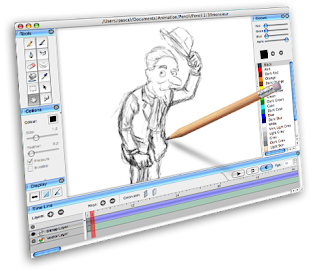
Pencil - Free 2D Animation Software


Pencil is a 2D bitmap and vector based, free animation tool for MACs, Windows and Linux that I'd like to say is the perfect introduction to 2D, computer assisted animation but can't.

It is a great tool. Clearly set out, easy enough to learn, versatile. In fact you can create an entire animation within Pencil, including audio tracks, and then export it all to a single movie file that you can upload anywhere. It will also export files as Flash/Shockwave movies (which is my interest in using it).

However, the Windows version of Pencil is extremely buggy making it frustrating to use and sometimes down right impossible (forced software closures, lost work etc.).

I suspect as a tool for creating animations, using bitmap images, Pencil is ideal. There's much less to go wrong. On top of that you could choose to edit all your frames in any bitmap editing software you choose then just import them into Pencil, add some sounds, export to a movie file and you're done. If that's all you need to do I highly recommend this software - its free - so give it a try.

Once you get into vector animation the frustration starts to set in. Specifically with the vector 'area fill' tool. If you haven't properly closed an area you'll keep getting a warning message telling you there's a gap in your drawing or you've 'Zoomed Out too much'. This is a known problem that is documented within Pencil's manual.

It's frustrating because often there are no obvious gaps - even if you zoom right in to check. I've found that larger areas are likely to trigger this warning. If you can't find any gaps then the best solution seems to be to break the area up into smaller fill areas using the 'invisible line' tool. Then fill each section as you go until the area is all filled.

Because of the buggy nature of this software, personally I wouldn't use it to create anything too advanced like a full vector animated movie. However if you're just looking for some vector animation software to create scalable, animated props, heads and backgrounds for your GoAnimate movies this is a good stop gap until you can get your hands on something better.

Pencil features a nice 'onion skin' tool that allows you to import a bitmap image onto one layer then use the vector tools to trace it - as I did with my animated campfire prop below (you may need to click on the image to see the larger version and my vector lines traced over the bitmap image).
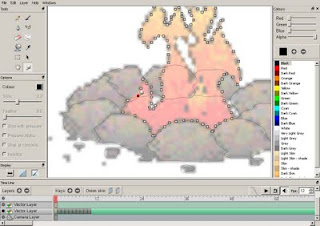

By converting the bitmap animated campfire into a vector animated campfire it will now look great in any scene without becoming pixelated if you zoom in for a close up.

You can see the fully animated version of the campfire in Deer Hunters Creek.

Pencil creates animation through the use of Key Frames. This is great because it means you don't have to draw everything on every single frame. For example, with my campfire I drew the rocks onto one key frame then, over the next ten frames I only drew the fire (which obviously had to move on every frame to look like, well... fire).

If you look closely at the image of the campfire above you can see along the bottom of the screen there is a time line featuring two Vector Layers. Within that time line there are rectangular boxes. Each box represents a key frame. On the first vector layer there is one key frame for the campfire rocks. On the second there are ten frames for the fire.

You'll notice there is also a camera layer in the time line. This layer is used to size and frame your various 'shots'. Just like other layers you create key frames for the different camera shots.

For GoAnimate users you'll need to create a camera layer for your object with just one key frame. The camera size should be the same size as the GoAnimate Studio Stage (550 x 354 pixels).

You'll then need to size your object relative to how big you want it to be (initially) compared to the stage (generally it's best to make sure your object always fits within the stage. You can easily make it larger once you've imported it onto the GoAnimate Stage).

You'll then need to position your object in the top left corner of the stage with the corner being approximately in the middle of the object as shown below. (If you're creating a head prop then the top left corner of the studio is roughly where the neck of your characters body will be).
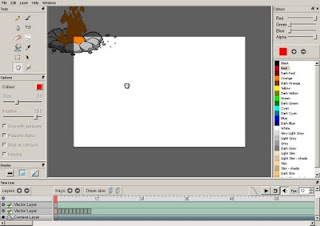

From there you simply export the file as a Flash/shockwave file (you will have to add the '.swf' extension to the file name yourself) ready to import into the GoAnimate Studio.

Note that for any GoAnimate users thinking that Pencil would be great for creating fully fledged GoAnimate compatible characters with, unfortunately you're out of luck. Whilst it's great for backgrounds, animated props and heads, it cannot save files in the correct format for characters.

Despite it's short comings I've used Pencil to create all my vector based props on GoAnimate. Sometimes I drag my feet thinking, oh no, I don't want to use pencil again, but, unless you want to buy some software, I haven't come across any other free vector animation software compatible with GoAnimate.

Like I said it's a good stop gap. If you find yourself using Pencil a lot and you're really interested in flash animation then you'll probably want to buy something better eventually.

That aside, for a free program it really does have potential. The drawing tools are quite basic but, with enough patience, you really could do some very impressive animation work.

Comments

  1. Awesome. Great review. I tried out pencil and found it frustrating. Possibly for the reasons you mentions. I can't quite remember.

    ReplyDelete
  2. Amazing review, very detailed.

    Just wondering, is it only for BETA users?

    ReplyDelete
  3. Not sure what you're asking Panda Boy? Pencil is free software for anyone to use.

    If you're asking if only GoAnimate Beta users can upload flash props etc. then I'm not sure. I think that is still the case but you would have to check with GoA's staff.

    ReplyDelete
  4. One thing that really impressed me was the smoothness of the pencil when drawing. I've worked with high-end animation and drawing programs that don't bother applying an iota of smoothing to drawn lines, leaving you with a grainy, pixelated mess. Flipbook softens that so that, if you're working with a fine enough line, it feels almost like drawing with a real pencil.

    ReplyDelete
  5. I haven't used Pencil much for freehand style drawing but it really does create some very smooth lines. Wish it was a much more complete program though.

    ReplyDelete
  6. this software is so annoying and so frustrating once i have finished what i am doing with it im going to burn the software to disk then spend several hours hitting it with a baseball bat till no fragments of the disk are left. dont get this software ever out of everything i have used this can be the most time consuming and annoying

    ReplyDelete
  7. I hear you anonymous ;-)

    Once you get a feel for what's likely to cause the program to crash you can minimize the annoyances.

    I try not to use Pencil for anything too complex simply because I'd probably end up hitting it with a baseball bat too.

    ReplyDelete
  8. All the comments makes me not to download it.

    ReplyDelete
  9. Nice tip. I find this one useful as a beginner and I was able to make my first transparent image. That is main objective is to make traditional animation and use of pencil design, just amazing.

    ReplyDelete

Post a Comment

This blog is monitored by a real human. Generic or unrelated spam comments with links to sites of dubious relativity may be DELETED.

I welcome, read, and respond to genuine comments relating to each post. If your comment isn't that save me some time by not posting it.

Popular posts from this blog

Inochi2D - Free Open Source 2D VTuber Avatar Rigging and Puppeteering Software (Part 1)

Inochi2D Creator - Free Open Source VTuber Software. If you've been looking for a way to live perform as a 2D cartoon avatar on camera, whether it be for a live stream or for pre-recorded content like educational videos, then VTuber software is a low cost (or even no cost) option worth looking into. In my previous post, How to Become a VTuber - 2D and 3D Software for Creating and Controlling Your Avatar , I took a brief look at the relatively new but completely free and open source Inochi2D  which I thought showed great potential for my own needs of creating a live performance character rig for my own TET Avatar that I use for all my promotional materials. While it is possible to live perform my character using Cartoon Animator itself, Reallusion's MotionLive2D capture system isn't great - with lip sync in particular. More importantly though, I can't exactly teach people how to use Cartoon Animator if I'm using Cartoon Animator to control my Avatar. What is Inochi2D

Moho 14 Released - Still the Best 2D Animation Software for Indy Animators on a Budget

Moho 14 Released. Regular readers know I am a Reallusion, Cartoon Animator advocate through and through. Hands down I would recommend Cartoon Animator 5 first over Lost Marble's Moho 14 to anyone who is just starting in 2D animation, is a team of one, or just needs to animate as quickly as possible. However, feature for feature, Moho is, arguably, the best 2D animation software for the rest of us who can't justify a Toon Boom Harmony , or Adobe Creative Cloud subscription (and even with their applications Moho is very competitive on features). You can get started with Moho Debut for just USD$59.99 which is a cut down version of Moho Pro but it still has the most essential features needed for 2D animation. While Moho Pro is a whopping USD$399.99 (Cartoon Animator, which only has one version, is just USD$149.00) upgrades to new version numbers come down to a quarter of the price at USD$99.00. Even though Reallusion just released features like Motion Pilot Puppet Animation and

2D Animation Side Hustle - How to Package, Upload, Optimize, Price, and Promote Your Content in the Reallusion 2D Marketplace

T his is the final post in my four part, 2D Animation Side Hustle series on Selling in the Reallusion 2D Marketplace. I'll look at how to package up your content and upload it to the Marketplace, how to optimize your listings, price, and how to sell through your store backend as well as off site through social media and other channels. If you haven't read previous articles in the series click these links for Part 1 - Can You Make Real Money , Part 2 - Finding Niches , and Part 3 - What to Sell . Before getting started you'll need to register as a Content Developer in order to see the backend of your store on the Reallusion Marketplace . Packaging Content and Uploading to the Marketplace Since the release of Cartoon Animator 5 the software has a built in Package Manager that makes it easy to assemble and upload your Content to the Marketplace. Reallusion has a comprehensive, official video (embeded below) that quickly explains the entire process in less than seven minutes. 

2D Animation Side Hustle - Deciding What to Sell in the Reallusion 2D Marketplace, Your USP, and Keeping Customers Coming Back

I n part three of my 2D Animation Side Hustle series on selling in the Reallusion 2D Marketplace I look at deciding what to sell, your unique selling proposition (USP), and look at a key strategy to keep people coming back to your store. If you missed part one on  Starting Your Side Hustle  and whether you can earn real money, or part two on  Niches and how to find ones in demand , I highly recommend you read them for a more complete picture of selling in the Reallusion 2D Marketplace. Deciding What To Sell The Reallusion 2D Marketplace is divided into four broad categories; Actors, Scenes, Motions, and Special FX. Each of these are also divided into further sub categories. Interestingly in the Marketplace Menu it lists how many items are available for each category, making it easy to see which may be under served and could present an opportunity. Reallusion 2D Marketplace Category Menu shows how many items are available in each category and could be a clue to what is being under serv

The Ultimate Independent Animator's App and Resource List 2019-2023 - Animation and Video Life

Image created with Cartoon Animator 4. Being an independent animator is not like a studio animation job. There's so much more to do that is indirectly related to the actual task of animating. Over the years I've sought out many apps, tools, and services that can help me achieve that one single task, expressing myself through animation. Below is my Ultimate Independent Animator's Resource List for 2019-2022. It started out as a list of free or low cost apps that could help you in every stage of producing either 2D or 3D animation, and then just kind of grew from there. You may not have been looking for a Time Management App as much as you needed something to get you started in 3D animation but when those commissioned projects start coming in you'll have a head start on maximizing your time. All the apps and services on this list had to meet two main criteria: They had to be useful and relevant to an Indy Animator/artist. The base app/service had to be US$

Wonder Unit Storyboarder - Free Storyboarding Software for People Who Can (or Can't) Draw

Wonder Unit Storyboarder.  As an independent and solo animator I'm always tempted to try and skip storyboarding my animated shorts because they're usually only single scene sketch comedy type jokes. As a result I have many unfinished projects that kind of petered out due to having no clear finishing line. Storyboarding your productions, no matter how small, gives you a step by step guide of every shot that needs to be completed (no planning shots as you animate). It also allows you to create an animatic that gives you a rough preview of the finished production. In short, you shouldn't skip storyboards as they, generally, increase the chance of the project being completed. Disclaimer - I'm Not a Fan of Storyboarder Upfront, Wonder Unit's Storyboarder  is not my preferred storyboarding software. However it's completely free, has a number of very compelling featu

Prome AI Sketch Render Tool - Your Tradigital Clean Up and Colorist Artist for Character and Background Design

Random character head, Biro sketches drawn by TET (left). Render by PromeAI (right) using Prome's Sketch Render tool set to 'Comon:Cartoon, Render Mode: Outline'. W hile I don't do New Year Resolutions, one of my plans for the year ahead is to do more of my own art. Specifically character design drawn in an actual, physical sketchbook.  To that end, I have been spending the last half hour of most days drawing a page or two of random biro sketches in my sketchbook and posting the pages to my Instagram account  (this link will take you to one of my posts). These sketches are mostly practicing my skills because I don't really draw regularly anymore. Here is a tip, if you do this kind of sketching, and push yourself to keep doing it, you will see many drawings that could be taken further, even if you don't have anything they're suited for just at the moment. Which is where my second favorite AI Image Tool (after Leonardo.ai )  PromeAI comes into play. PromeAI