Cartoon Animator 5 and G2 Characters - Why You'll Probably Never Use Them Even Though They're Great

G2 Characters in Cartoon Animator 5

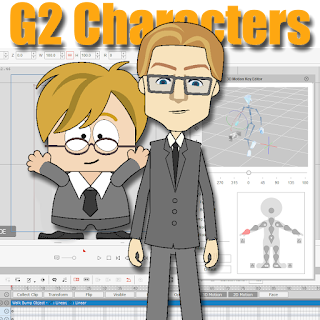
Since I've previously covered how to get the most out of your purchased G3 and G1 characters for Reallusion's Cartoon Animator 5, it would be remiss of me not to look at the greatest character rig of all time, G2 characters.

G2 Characters have been mostly relegated to legacy status since Cartoon Animator 3 but, as a rig that let you create fully 360 degree turn-able characters that moved in 3D space, animated with 3D motion files, and were mostly vector based, there was nothing else like them in any other 2D  software.

The problem was, even with the templates provided by Reallusion for both Adobe Flash and Serif DrawPlus, they were complex and time consuming to make from scratch. They were also difficult to customize because there was no way to export and edit individual parts.

G2 characters just weren't easy enough for the casual Cartoon Animator user to customize so they fell by the wayside. However they're still fully supported in CA5 with all the same functionality.

G2 Character Mashups

You can mashup G2 characters, exactly like you can mix and match parts to create variations of G1 and G3 characters. As per G1 and G3 characters you can only mix and match G2 characters with G2 parts, but you can add props and accessories from any generation.

The Reallusion Content store sells four G2 Power Tools Packs with a wide range of character content that will give you plenty of mashup options. In particular, if you're a South Park fan, the Buddy's World pack (G2 Power Tools Volume 4) is virtually everything you need to make your own fan animations.

Be sure to search the Reallusion Marketplace too for more G2 characters (and a heck of a lot of superhero Buddies).

G2 Power Tool Packs available in the Reallusion Content Store
These four G2 Power Tool Packs are all available in Reallusion's Content Store
and will give you plenty of options for different animations.

Just like G1 characters many of the props created for G2 characters were also vector based. Unlike G1 characters G2 characters and their props were specifically designed to work with the Render Styles system which allows you to remove or adjust the outline thickness, and to change color schemes with a single click using any of the ten inbuilt styles (as well as being able to completely customize the colors yourself).

Actually mashing up G2 characters works pretty much the same as G1 and G3 but some things to note in the composer include:
  • G2 Characters are multi-angled with 10 perspectives including above and below. Use the angle change compass to see each view as you edit.
  • Changing the position of bones or face features on one angle will not affect all the other angles unless you have the Angle Linked checkbox ticked. You can also mirror bone adjustments with the Mirror checkbox ticked.
  • G2 Character bodies are divided into Upper (torso and arms) and Lower (hip and legs). making it quick to mix and match outfits.
  • G2 Characters have a standard color naming convention for the Render Styles palette making it relatively easy to learn the color groupings.
  • While Joint masks are specific to G2 characters you can largely ignore them unless you're attempting to make a character from scratch. Their purpose is to help hide unwanted outlines at the character's joints.
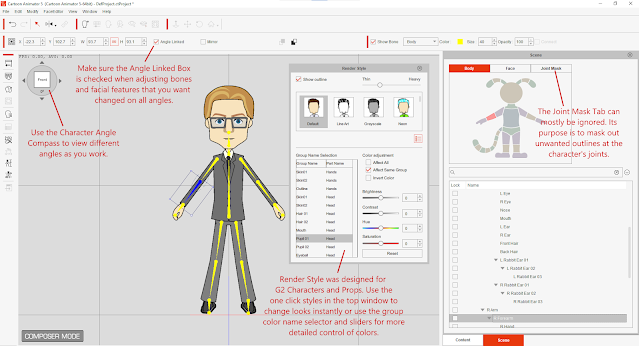
Items of note when editing G2 Characters in the Composer.
For the most part mashing up G2 characters in the Composer is the same as
G1 and G3 characters but there are a few things to be aware of.

G2 Customization/Creation from Scratch
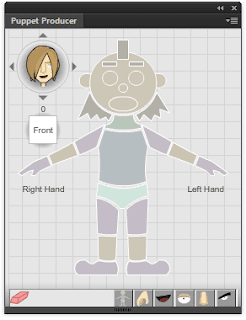
Toon Titan's Puppet Producer Plug-in for Adobe Animate CC
Toon Titan's Puppet Producer Plug-in
for Adobe Animate CC
For small outfit customizations you can attach items as accessories, or it is possible to replace sprites. Just be aware, for sprite replacement, G2 characters will only accept .SWF files if you want to use vectors (they do not support .SVG). Don't forget the characters are multi angled so a change on one angle may need to be made across multiple angles.

If you really want to go all in and make your own G2 characters the fastest way is to use Adobe Animate CC with Toon Titan's Puppet Producer Plug-in.

I know I previously mentioned there are Flash and DrawPlus templates available but if you have Adobe Animate CC save yourself the headache and buy Puppet Producer for it.

If you have DrawPlus, go and read my posts from back in the day (linked below) when I attempted to use those templates to create my G2 characters (the ones you can't buy from my store because I never finished them). I don't know anyone that made a successful G2 character using DrawPlus.
These characters took me weeks and in both cases I never finished drawing or rigging the faces. You'll have an easier time using the sprite replacement method.

Animating G2 Characters - There's an Order
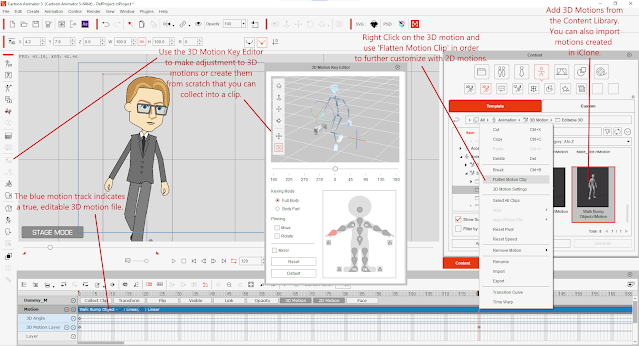
G2 characters simulate 3D motion files much better than their G3 counterparts. This is because they have multiple angles of the same sprite and the perspective and layer order is automatically calculated as you apply motion files or key frame them using the 3D Key Frame Editor.

While the process of animating a G2 character is not dissimilar to G3 characters, because they can use 'true' 3D motions that can be edited (unlike G3 characters where their 3D motions are flattened to 2D motions as soon as they are applied), it is recommended that you animate all their 3D motions first. Once done, flatten the 3D motions before using the 2D motion editor to apply further Transforms, Deforms, and Sprite switching etc.

Animating G2 characters with the 3D motion key editor.
The 3D Motion Key Editor lets you key frame and pose G2 characters similar
to how you would do the same in a 3D application like iClone.

Rather than me explaining all the finer points of animating G2 characters, below is a video tutorial Reallusion released for CrazyTalk Animator 2, when G2 characters were first introduced. It's an excellent run through of the entire process in just 20 minutes. While the User Interface is a little different in CrazyTalk Animator 2 you should be able to find your way around as all the key elements are mostly the same in CA5.


Why You'll Probably Never Use G2 Characters Even Though They're Great

Look, never say never, but most newcomers to Cartoon Animator discover G2 characters and think they're amazing... and they are. The ability to have a character face any direction in 2D animation is an often requested feature (How do I show my characters from the back?).

However, the official Reallusion, G2 character range wasn't well designed. Quite often they looked a little weird at the three quarter angles (e.g. 45, 135, 225, 315 degrees). Combine this with how complex they are to make from scratch, or even to customize outside of the available to purchase content and you'll quickly realize G3 characters are much easier - and how often do you really need to see them from the back?

The one caveat. If you really want to make South Park Fan Animation, G2 Power Tools Volume 4, Buddy's World, has everything you need, characters, outfits, premade motions, scenes, props etc. Plus it's quite easy to customize that character style with their simple body shapes, using the sprite replacement method.

Buddy's World Jay and Silent Bob characters by TET.
These Jay and Silent Bob characters I made from stock parts
available in G2 Power Tools Volume 4, Buddy's World.

Prior to Cartoon Animator 5's release there were rumors that G3 characters would gain the ability to turn their bodies in a similar fashion to G2 characters. Unfortunately it didn't eventuate but I hope some day Reallusion will retool the G2 character system to bring this awesome functionality to G3 characters. 

Just needs an easier system to create and import their sprites in either raster or SVG format.

Comments

Popular posts from this blog

Inochi2D - Free Open Source 2D VTuber Avatar Rigging and Puppeteering Software (Part 1)

Inochi2D Creator - Free Open Source VTuber Software. If you've been looking for a way to live perform as a 2D cartoon avatar on camera, whether it be for a live stream or for pre-recorded content like educational videos, then VTuber software is a low cost (or even no cost) option worth looking into. In my previous post, How to Become a VTuber - 2D and 3D Software for Creating and Controlling Your Avatar , I took a brief look at the relatively new but completely free and open source Inochi2D  which I thought showed great potential for my own needs of creating a live performance character rig for my own TET Avatar that I use for all my promotional materials. While it is possible to live perform my character using Cartoon Animator itself, Reallusion's MotionLive2D capture system isn't great - with lip sync in particular. More importantly though, I can't exactly teach people how to use Cartoon Animator if I'm using Cartoon Animator to control my Avatar. What is Inochi2D

Wonder Unit Storyboarder - Free Storyboarding Software for People Who Can (or Can't) Draw

Wonder Unit Storyboarder.  As an independent and solo animator I'm always tempted to try and skip storyboarding my animated shorts because they're usually only single scene sketch comedy type jokes. As a result I have many unfinished projects that kind of petered out due to having no clear finishing line. Storyboarding your productions, no matter how small, gives you a step by step guide of every shot that needs to be completed (no planning shots as you animate). It also allows you to create an animatic that gives you a rough preview of the finished production. In short, you shouldn't skip storyboards as they, generally, increase the chance of the project being completed. Disclaimer - I'm Not a Fan of Storyboarder Upfront, Wonder Unit's Storyboarder  is not my preferred storyboarding software. However it's completely free, has a number of very compelling featu

Glif (Alpha) - Make Your Own Tiny AI Powered Niche Image Generator Apps

I  first heard about Glif through a YouTube video that mentioned you could get access to Flux Pro (the latest 'game changer AI' generative image model) through the site for free. While I had a vague notion from the video of what Glif was, I wasn't expecting it to be so easy to get started with, and so good with my very first results. Glif is an easy to use, low-code platform for creating tiny AI-powered generators called Glifs. While that may not sound inspiring, what Glifs allow you to do is create a tiny app that niches down to a specific type of AI generation that the user modifies with their own inputs. The best way to really understand is with an example.  My First Glif I've recently been using VivaGo's AI platform  (free and unlimited at the time of writing) to consistently generate full body characters in a front facing T-Pose that I can rig as front facing characters in Cartoon Animator. Unfortunately it can be a bit hit or miss maintaining the T-Pose part

Krita AI Diffusion - Generative Image AI For Krita is Seriously Useful, Powerful and Free (If You Can Install it Locally)

Generative AI sequence of a woman in a business suit. From sketch to refined image using Krita AI Diffusion - by TET G enerative image AI, where you describe an image with a text prompt to an Artificial Intelligence model and it produces a new image based on your prompt, is gaining a strong hold as a tool for many artists. Krita AI Diffusion brings generative AI image tools right into your favourite free and opensource, graphics editor, Krita. Not only that, if you have a computer with decent specs (and at least 10GB of hard drive space), Krita AI Diffusion is completely free. What If I Don't Have a Powerful Computer? If you're in my situation, with a computer that was around before anyone in the mainstream had even heard of generative AI, you can still access Krita AI Diffusion for free, using a cloud based AI server, Interstice  and 300 tokens, to get you started. Once your initial tokens run out, purchase 5000 more for 10€ (approx US$11.00). Tokens never expire. I would

The Ultimate Independent Animator's App and Resource List 2019-2023 - Animation and Video Life

Image created with Cartoon Animator 4. Being an independent animator is not like a studio animation job. There's so much more to do that is indirectly related to the actual task of animating. Over the years I've sought out many apps, tools, and services that can help me achieve that one single task, expressing myself through animation. Below is my Ultimate Independent Animator's Resource List for 2019-2022. It started out as a list of free or low cost apps that could help you in every stage of producing either 2D or 3D animation, and then just kind of grew from there. You may not have been looking for a Time Management App as much as you needed something to get you started in 3D animation but when those commissioned projects start coming in you'll have a head start on maximizing your time. All the apps and services on this list had to meet two main criteria: They had to be useful and relevant to an Indy Animator/artist. The base app/service had to be US$

Dollars Mocap: Full Body Webcam Motion Capture (Including Hands and Fingers) For iClone and Cartoon Animator

Even though I should be further away from the camera Dollars Mocap MONO still does a good job of  tracking my arms, hands and fingers. Ever since I wrote my series on becoming a VTuber , discovering it was possible to do full body motion capture, including hands and fingers, with just software and a webcam, I've been on the look out for any motion capture software that can bring that functionality to Cartoon Animator. Dollars Mocap is a low cost motion capture application with a free trial that I learned about through the YouTube Channel Digital Puppets  and their test video . It can record full body, upper body, arms and hands, and facial mocap from a live video source or pre-recorded video. Investigating further, I discovered not only does Dollars Mocap have a free iClone7, iClone8 character profile file download (look for it at the bottom of the main program download page), so you can use the saved motions with iClone8, they've also got a demo video for how to convert your

Review: Headshot Plugin for Reallusion's Character Creator 3

Headshot for CC3. Quite possibly the best 3D Avatar I've made of myself in any 3D application. Creating a realistic 3D human avatar is a whole lot easier with Reallusion's new Headshot Plugin for Character Creator 3. The plugin is an AI powered extension that can generate 3D digital humans from one photo. Which sounds like an amazing proposition but, in practice, if you're trying to achieve a specific likeness to an actual person, Headshot will give you an excellent base to work from. Headshot has two modes, Auto and Pro. Auto Mode Auto is well worth a try if you have an ideal photo of a front facing person that is properly lit and posed to Headshot's optimum requirements. It's also the only mode that will take a crack at generating a hair model. I grabbed an image of Harrison Ford, dragged it into Headshot without changing any of the default settings (other than specifying 'male' and selecting an 'old male' setting) and this is what I